DC733 DC740 DC750 DW907
|
|
|
- Göker Bagci
- 8 yıl önce
- İzleme sayısı:
Transkript
1 DC733 DC740 DC750 DW907

2 English (original instructions) 04 Türkçe (orijinal talimatlardan çevrilmiştir) 15 2

3 Figure 1 c d e f b a m Dc733 DC740 DC750 h n i j DC733, DC740 c d e f b a DW907 h i j 1

4 Figure 2 j k l Figure 3 A B o o Figure 4 Figure 5 p q e 2

5 Figure Figure 7 b f Figure 8 Figure 9 Figure 10 3
6 English CORDLESS DRILL/DRIVER DC733, DC740, DC750, DW907 Congratulations! You have chosen a DeWALT tool. Years of experience, thorough product development and innovation make DeWALT one of the most reliable partners for professional power tool users. Technical Data DC733 DC740 DW907 DC750 Voltage V Type No-load speed 1st gear min nd gear min Max, torque Nm Chuck capacity mm Maximum drilling capacity in steel/wood mm 10/30 10/25 10/25 10/22 Weight (without battery pack) kg L PA (sound pressure) db(a) K PA (sound pressure uncertainty) db(a) L WA (sound power) db(a) K WA (sound power uncertainty) db(a) Vibration total values (triax vector sum) determined according to EN 0745: Drilling into metal a h,d = m/s² Uncertainty K = m/s² Screwdriving without impact a h = m/s² Uncertainty K = m/s² The vibration emission level given in this information sheet has been measured in accordance with a standardised test given in EN 0745 and may be used to compare one tool with another. It may be used for a preliminary assessment of exposure. WARNING: The declared vibration emission level represents the main applications of the tool. However if the tool is used for different applications, with different accessories or poorly maintained, the vibration emission may differ. This may significantly increase the exposure level over the total working period. An estimation of the level of exposure to vibration should also take into account the times when the tool is switched off or when it is running but not actually doing the job. This may significantly reduce the exposure level over the total working period. Identify additional safety measures to protect the operator from the effects of vibration such as: maintain the tool and the accessories, keep the hands warm, organisation of work patterns. Battery pack DE902 DE9074 DE9071 DWCB12 Battery type NiCd NiCd NiCd NiCd Voltage V Capacity Ah Weight kg Battery pack DE9501 DE9502 DE9091 DWCB14 Battery type NiMH NiMH Li-Ion NiCd Voltage V Capacity Ah Weight kg Battery pack DE9094 DE9140 DE9141 Battery type NiCd Li-Ion Li-Ion Voltage V Capacity Ah Weight kg Charger DE911 DE9118 DE9135 Battery type NiCd/NiMH NiCd NiCd/ NiMH/Li-Ion Mains voltage VAC Approx. charging time min 40 (2,0 Ah 0 (2,0 Ah 40 (2,0 Ah battery battery battery packs) packs) packs) Weight kg

7 English Fuses: Europe 230 V tools 10 Amperes, mains U.K. & Ireland 230 V tools 3 Amperes, in plugs Definitions: Safety Guidelines The definitions below describe the level of severity for each signal word. Please read the manual and pay attention to these symbols. DANGER: Indicates an imminently hazardous situation which, if not avoided, will result in death or serious injury. WARNING: Indicates a potentially hazardous situation which, if not avoided, could result in death or serious injury. CAUTION: Indicates a potentially hazardous situation which, if not avoided, may result in minor or moderate injury. NOTICE: Indicates a practice not related to personal injury which, if not avoided, may result in property damage. Denotes risk of electric shock. Denotes risk of fire. EC-Declaration of Conformity Machinery Directive DC733, DC740, DC750, DW907 DeWALT declares that these products described under Technical Data are in compliance with: 200/42/EC, EN , EN , EN These products also comply with Directive 2004/108/EC and 2011/5/EU. For more information, please contact DeWALT at the following address or refer to the back of the manual. The undersigned is responsible for compilation of the technical file and makes this declaration on behalf of DeWALT. Horst Grossmann Vice President Engineering and Product Development DeWALT, Richard-Klinger-Straße 11, D-5510, Idstein, Germany WARNING: To reduce the risk of injury, read the instruction manual. General Power Tool Safety Warnings WARNING! Read all safety warnings and instructions. Failure to follow the warnings and instructions may result in electric shock, fire and/or serious injury. Save all warnings and instructions for future reference The term power tool in the warnings refers to your mains-operated (corded) power tool or batteryoperated (cordless) power tool. 1) Work area safety a) Keep work area clean and well lit. Cluttered or dark areas invite accidents. b) Do not operate power tools in explosive atmospheres, such as in the presence of flammable liquids, gases or dust. Power tools create sparks which may ignite the dust or fumes. c) Keep children and bystanders away while operating a power tool. Distractions can cause you to lose control. 2) Electrical safety a) Power tool plugs must match the outlet. Never modify the plug in any way. Do not use any adapter plugs with earthed (grounded) power tools. Unmodified plugs and matching outlets will reduce risk of electric shock. b) Avoid body contact with earthed or grounded surfaces such as pipes, radiators, ranges and refrigerators. There is an increased risk of electric shock if your body is earthed or grounded. c) Do not expose power tools to rain or wet conditions. Water entering a power tool will increase the risk of electric shock. 5

8 English d) Do not abuse the cord. Never use the cord for carrying, pulling or unplugging the power tool. Keep cord away from heat, oil, sharp edges or moving parts. Damaged or entangled cords increase the risk of electric shock. e) When operating a power tool outdoors, use an extension cord suitable for outdoor use. Use of a cord suitable for outdoor use reduces the risk of electric shock. f) If operating a power tool in a damp location is unavoidable, use a residual current device (RCD) protected supply. Use of an RCD reduces the risk of electric shock. 3) Personal safety a) Stay alert, watch what you are doing and use common sense when operating a power tool. Do not use a power tool while you are tired or under the influence of drugs, alcohol or medication. A moment of inattention while operating power tools may result in serious personal injury. b) Use personal protective equipment. Always wear eye protection. Protective equipment such as dust mask, non-skid safety shoes, hard hat, or hearing protection used for appropriate conditions will reduce personal injuries. c) Prevent unintentional starting. Ensure the switch is in the off position before connecting to power source and/or battery pack, picking up or carrying the tool. Carrying power tools with your finger on the switch or energising power tools that have the switch on invites accidents. d) Remove any adjusting key or wrench before turning the power tool on. A wrench or a key left attached to a rotating part of the power tool may result in personal injury. e) Do not overreach. Keep proper footing and balance at all times. This enables better control of the power tool in unexpected situations. f) Dress properly. Do not wear loose clothing or jewellery. Keep your hair, clothing and gloves away from moving parts. Loose clothes, jewellery or long hair can be caught in moving parts. g) If devices are provided for the connection of dust extraction and collection facilities, ensure these are connected and properly used. Use of dust collection can reduce dust-related hazards. 4) Power tool use and care a) Do not force the power tool. Use the correct power tool for your application. The correct power tool will do the job better and safer at the rate for which it was designed. b) Do not use the power tool if the switch does not turn it on and off. Any power tool that cannot be controlled with the switch is dangerous and must be repaired. c) Disconnect the plug from the power source and/or the battery pack from the power tool before making any adjustments, changing accessories, or storing power tools. Such preventive safety measures reduce the risk of starting the power tool accidentally. d) Store idle power tools out of the reach of children and do not allow persons unfamiliar with the power tool or these instructions to operate the power tool. Power tools are dangerous in the hands of untrained users. e) Maintain power tools. Check for misalignment or binding of moving parts, breakage of parts and any other condition that may affect the power tool s operation. If damaged, have the power tool repaired before use. Many accidents are caused by poorly maintained power tools. f) Keep cutting tools sharp and clean. Properly maintained cutting tools with sharp cutting edges are less likely to bind and are easier to control. g) Use the power tool, accessories and tool bits etc., in accordance with these instructions taking into account the working conditions and the work to be performed. Use of the power tool for operations different from those intended could result in a hazardous situation. 5) Battery tool use and care a) Recharge only with the charger specified by the manufacturer. A charger that is suitable for one type of battery pack may create a risk of fire when used with another battery pack. b) Use power tools only with specifically designated battery packs. Use of any other battery packs may create a risk of injury and fire. c) When battery pack is not in use, keep it away from other metal objects like paper clips, coins, keys, nails, screws or other small metal objects that can make a
 Personal safety a) Stay alert, watch what you are doing and use common sense when operating a power tool.")
9 English connection from one terminal to another. Shorting the battery terminals together may cause burns or a fire. d) Under abusive conditions, liquid may be ejected from the battery, avoid contact. If contact accidentally occurs, flush with water. If liquid contacts eyes, additionally seek medical help. Liquid ejected from the battery may cause irritation or burns. ) Service a) Have your power tool serviced by a qualified repair person using only identical replacement parts. This will ensure that the safety of the power tool is maintained. Additional Specific Safety Rules for Drills Wear ear protectors. Exposure to noise can cause hearing loss. Hold power tool by insulated gripping surfaces only, when performing an operation where the cutting accessory may contact hidden wiring or its own cord. Cutting accessory contacting a live wire may make exposed metal parts of the power tool live and shock the operator. Use clamps or other practical way to secure and support the workpiece to a stable platform. Holding the work by hand or against your body is unstable and may lead to loss of control. Wear safety goggles or other eye protection. Drilling operations cause chips to fly. Flying particles can cause permanent eye damage. Bits and tools get hot during operation. Wear gloves when touching them. Keep handles dry, clean, free from oil and grease. it is recommended to use rubber gloves. This will enable better control of the tool. Residual Risks The following risks are inherent to the use of drills: Injuries caused by touching the rotating parts or hot parts of the tool. In spite of the application of the relevant safety regulations and the implementation of safety devices, certain residual risks cannot be avoided. These are: Impairment of hearing. Risk of squeezing fingers when changing accessories. Health hazards caused by breathing dust developed when working in wood. Risk of personal injury due to flying particles. Risk of personal injury due to prolonged use. Markings on Tool The following pictograms are shown on the tool: Read instruction manual before use. Date Code Position The Date Code, which also includes the year of manufacture, is printed into the housing surface that forms the mounting joint between tool and battery. Example: 2012 XX XX Year of Manufacture Important Safety Instructions for All Battery Chargers SAVE THESE INSTRUCTIONS: This manual contains important safety and operating instruc tions for the DE911/DE9118/DE9135 battery chargers. Before using charger, read all instructions and cautionary markings on charger, battery pack, and product using battery pack. DANGER: Electrocution hazard. 230 volts are present at charging terminals. Do not probe with conductive objects. Electric shock or electrocution may result. WARNING: Shock hazard. Do not allow any liquid to get inside charger. Electric shock may result. Caution: Burn hazard. To reduce the risk of injury, charge only DeWALT rechargeable batteries. Other types of batteries may burst causing personal injury and damage. Caution: Under certain conditions, with the charger plugged in to the power supply, the exposed charging contacts inside the charger can be shorted by foreign material. Foreign materials of a conductive nature such as, but not limited to, steel wool, aluminum foil, or any buildup of metallic particles should be kept away from charger cavities. Always unplug the 7

10 English charger from the power supply when there is no battery pack in the cavity. Unplug charger before attempting to clean. DO NOT attempt to charge the battery pack with any chargers other than the ones in this manual. The charger and battery pack are specifically designed to work together. These chargers are not intended for any uses other than charging DeWALT rechargeable batteries. Any other uses may result in risk of fire, electric shock or electrocution. Do not expose charger to rain or snow. Pull by plug rather than cord when disconnecting charger. This will reduce risk of damage to electric plug and cord. Make sure that cord is located so that it will not be stepped on, tripped over, or otherwise subjected to damage or stress. Do not use an extension cord unless it is absolutely necessary. Use of improper extension cord could result in risk of fire, electric shock, or electrocution. Do not place any object on top of charger or place the charger on a soft surface that might block the ventilation slots and result in excessive internal heat. Place the charger in a position away from any heat source. The charger is ventilated through slots in the top and the bottom of the housing. Do not operate charger with damaged cord or plug have them replaced immediately. Do not operate charger if it has received a sharp blow, been dropped, or otherwise damaged in any way. Take it to an authorized service center. Do not disassemble charger; take it to an authorized service center when service or repair is required. Incorrect reassembly may result in a risk of electric shock, electrocution or fire. Disconnect the charger from the outlet before attempting any cleaning. This will reduce the risk of electric shock. Removing the battery pack will not reduce this risk. NEVER attempt to connect 2 chargers together. The charger is designed to operate on standard 230V household electrical power. Do not attempt to use it on any other voltage. This does not apply to the vehicular charger. SAVE THESE INSTRUCTIONS Chargers Your DE911 charger accepts DeWALT NiCd and NiMH battery packs ranging from 7.2 V to 18 V. Your DE9118 charger accepts DeWALT NiCd battery packs ranging from 7.2 V to 14.4 V. The DE9135 charger accepts 7.2 to 18 V NiCd, NiMH or Li-Ion batteries. These chargers require no adjustment and are designed to be as easy as possible to operate. Charging Procedure (fig. 2) DANGER: Electrocution hazard. 230 volts present at charging terminals. Do not probe with conductive objects. Danger of electric shock or electrocution. 1. Plug the charger (k) into an appropriate outlet before inserting battery pack. 2. Insert the battery pack into the charger. The red (charging) light will blink continuously indicating that the charging process has started. 3. The completion of charge will be indicated by the red light remaining ON continuously. The pack is fully charged and may be used at this time or left in the charger. Note: To ensure maximum performance and life of NiCd, NiMH and Li-Ion batteries, charge the battery for a minimum of 10 hours before first use. Charging Process Refer the table below for the state of charge of the battery pack. State of charge charging fully charged hot/cold pack delay replace battery pack problem Automatic Refresh (DE911, DE9135) The automatic refresh mode will equalise or balance the individual cells in the battery pack at its peak capacity. Battery packs should be refreshed weekly or whenever the pack no longer delivers the same amount of work. 8

11 English To refresh your battery pack, place the battery in the charger as usual. Leave the battery pack for at least 10 hours in the charger. Hot/Cold Pack Delay (DE911, DE9135) When the charger detects a battery that is too hot or too cold, it automatically starts a Hot/Cold Pack Delay, suspending charging until the battery has reached an appropriate temperature. The charger then automatically switches to the pack charging mode. This feature ensures maximum battery life. Li-Ion battery packs only Li-Ion batteries are designed with an Electronic Protection System that will protect the battery against overloading, overheating or deep discharge. The tool will automatically turn off if the Electronic Protection System engages. If this occurs, place the Li-Ion battery on the charger until it is fully charged. Important Safety Instructions for All Battery Packs When ordering replacement battery packs, be sure to include catalog number and voltage. The battery pack is not fully charged out of the carton. Before using the battery pack and charger, read the safety instructions below. Then follow charging procedures outlined. Read all Instructions Do not charge or use battery in explosive atmospheres, such as in the presence of flammable liquids, gases or dust. Inserting or removing the battery from the charger may ignite the dust or fumes. Charge the battery packs only in DeWALT chargers. DO NOT splash or immerse in water or other liquids. Do not store or use the tool and battery pack in locations where the temperature may reach or exceed 40 C (105 F) (such as outside sheds or metal buildings in summer). Danger: Never attempt to open the battery pack for any reason. If battery pack case is cracked or damaged, do not insert into charger. Do not crush, drop or damage battery pack. Do not use a battery pack or charger that has received a sharp blow, been dropped, run over or damaged in any way (i.e., pierced with a nail, hit with a hammer, stepped on). Electric shock or electrocution may result. Damaged battery packs should be returned to service center for recycling. Caution: When not in use, place tool on its side on a stable surface where it will not cause a tripping or falling hazard. Some tools with large battery packs will stand upright on the battery pack but may be easily knocked over. Specific Safety instructions for Nickel Cadmium (NiCd) or Nickel Metal Hydride (NiMH) Do not incinerate the battery pack even if it is severely damaged or is completely worn out. The battery pack can explode in a fire. A small leakage of liquid from the battery pack cells may occur under extreme usage or temperature conditions. This does not indicate a failure. However, if the outer seal is broken: a. and the battery liquid gets on your skin, immediately wash with soap and water for several minutes. b. and the battery liquid gets into your eyes, flush them with clean water for a minimum of 10 minutes and seek immediate medical attention. (Medical note: The liquid is 25 35% solution of potassium hydroxide.) Specific Safety instructions for Lithium Ion (Li-Ion) Do not incinerate the battery pack even if it is severely damaged or is completely worn out. The battery pack can explode in a fire. Toxic fumes and materials are created when lithium ion battery packs are burned. If battery contents come into contact with the skin, immediately wash area with mild soap and water. If battery liquid gets into the eye, rinse water over the open eye for 15 minutes or until irritation ceases. If medical attention is needed, the battery electrolyte is composed of a mixture of liquid organic carbonates and lithium salts. Contents of opened battery cells may cause respiratory irritation. Provide fresh air. If symptoms persists, seek medical attention. WARNING: Burn hazard. Battery liquid may be flammable if exposed to spark or flame. 9

12 English Battery Cap (fig. 3) A protective battery cap is supplied to cover the contacts of a detached battery pack. Without the protective cap in place, loose metal objects could short circuit the contacts, causing a fire hazard and damaging the battery pack. 1. Take off the protective battery cap (o) before placing the battery pack in the charger or tool (fig. 3A). 2. Place the protective cap over the contacts immediately after removing the battery pack from the charger or tool (fig. 3B). Warning: Make sure the protective battery cap is in place before storing or carrying a detached battery pack. Battery Pack (fig. 1) Battery type The DC733 operates on 14.4 volt battery packs. The DC740 and DW907 operate on 12 volt battery packs. The DC750 operate on 9. volt battery packs. Storage Recommendations 1. The best storage place is one that is cool and dry away from direct sunlight and excess heat or cold. For optimum battery performance and life, store battery packs at room temperature when not in use. NOTE: Li-Ion battery packs should be fully charged when stored. 2. Long storage will not harm the battery pack or charger. Under proper conditions, they can be stored for up to 5 years. Labels on Charger and Battery Pack In addition to the pictographs used in this manual, the labels on the charger and the battery pack show the following pictographs: Read instruction manual before use. Battery charging. Battery charged. Battery defective. Hot/cold pack delay. Do not probe with conductive objects. Do not charge damaged battery packs. Use only with DeWALT battery packs, others may burst, causing personal injury and damage. Do not expose to water. Have defective cords replaced immediately. Charge only between 4 C and 40 C. Discard the battery pack with due care for the environment. Do not incinerate the battery pack NiMH, NiCd+ and Li-Ion. Charges NiMH and NiCd battery packs. Charges Li-Ion battery packs. See Technical Data for charging time. Package Contents The package contains: 1 Cordless drill/driver 1 Belt hook (DC733, DC740) 1 Charger 1 Battery pack (K models) 2 Battery packs (KA, KL and KB models) 1 Screwdriver bit 1 Kitbox (K-models only) 1 Instruction manual 1 Exploded drawing Note: Battery packs and chargers are not included with N-models. Check for damage to the tool, parts or accessories which may have occurred during transport. Take the time to thoroughly read and understand this manual prior to operation. 10
.")
13 English Description (fig. 1 3) WARNING: Never modify the power tool or any part of it. Damage or personal injury could result. a. Variable speed switch b. Forward/reverse slider c. Keyless chuck d. Mode selector/torque adjustment collar e. Collar settings f. Two gear selector h. Grip i. Battery pack j. Release buttons k. Charger l. Charging indicator (red) m. Belt hook (DC733, DC740) INTENDED USE Your cordless drill/drivers have been designed for professional drilling and screwdriving applications. Do not use under humid conditions or in presence of flammable liquids or gases. These cordless drill/drivers are professional power tools. Do not let children come into contact with the tool. Supervision is required when inexperienced operators use this tool. Belt Hook (DC733, DC740) (fig. 1) WARNING: To reduce the risk of serious personal injury, DO NOT suspend tool overhead or suspend objects from the belt hook. ONLY hang tool s belt hook from a work belt. WARNING: To reduce the risk of serious personal injury, ensure the screw (n) holding the belt hook is secure. The belt hook (m) can be be attached to either side of the tool to accommodate left- or right- handed users. If the hook is not desired at all, it can be removed from the tool. To move belt hook, remove the screw (n) that holds the belt hook in place then reassemble on the opposite side. Electrical Safety The electric motor has been designed for one voltage only. Always check that the battery pack voltage corresponds to the voltage on the rating plate. Also make sure that the voltage of your charger corresponds to that of your mains. Your DeWALT charger is double insulated in accordance with EN 0335; therefore no earth wire is required. If the supply cord is damaged, it must be replaced by a specially prepared cord available through the DeWalt service organization. Mains Plug Replacement (U.K. & Ireland Only) If a new mains plug needs to be fitted: Safely dispose of the old plug. Connect the brown lead to the live terminal in the plug. Connect the blue lead to the neutral terminal. Warning: No connection is to be made to the earth terminal. Follow the fitting instructions supplied with good quality plugs. Recommended fuse: 3 A. Using an Extension Cable An extension cord should not be used unless absolutely necessary. Use an approved extension cable suitable for the power input of your charger (see Technical Data). The minimum conductor size is 1 mm 2 ; the maximum length is 30 m. When using a cable reel, always unwind the cable completely. Assembly and adjustments Warning: Prior to assembly and adjustment, always remove the battery pack. Always switch off the tool before inserting or removing the battery pack. Warning: Use only DeWALT battery packs and chargers. Inserting and Removing the Battery Pack from the Tool (fig. 2) WARNING: To reduce the risk of serious personal injury, turn tool off and disconnect battery pack before making any adjustments or removing/ installing attachments or accessories. An accidental start-up can cause injury. 11

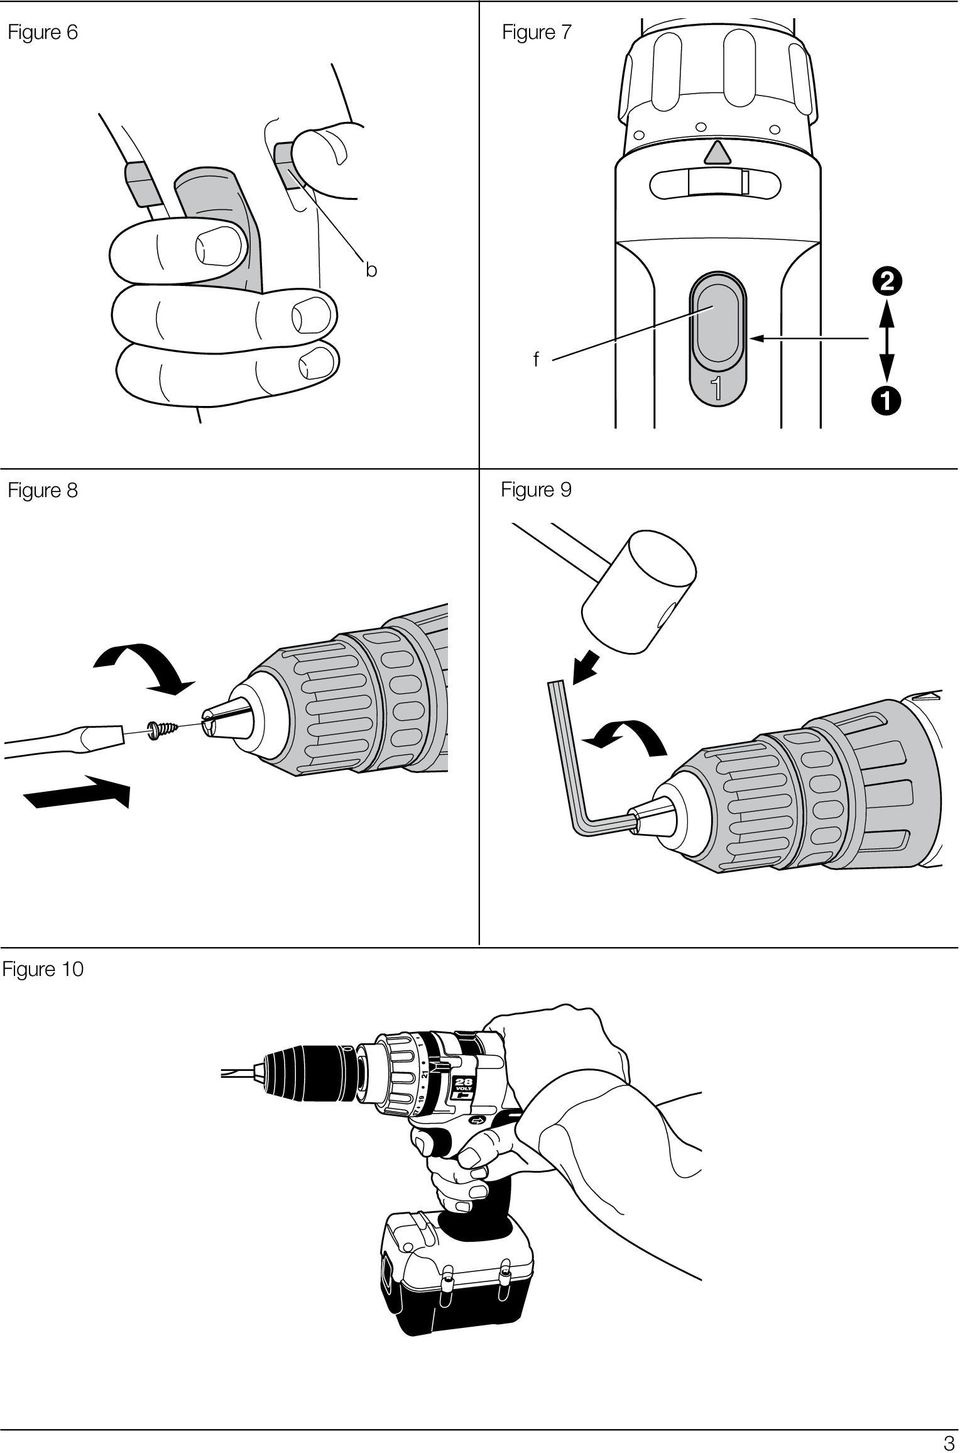
14 English To install the battery pack into the tool handle 1. Align the base of the tool with the notch inside the tool s handle (fig. 2). 2. Slide the battery pack firmly into the handle until you hear the lock snap into place. To remove the battery pack from the tool 1. Press the release buttons (j) and firmly pull the battery pack out of the tool handle. 2. Insert battery pack into the charger as described in the charger section of this manual. Inserting and removing bits (fig. 1, 4) 1. Open the chuck by turning the sleeve (p) counterclockwise and insert the bit shank. 2. Place the bit in the chuck as far as it will go and lift slightly before tightening. 3. Tighten firmly by turning the sleeve clockwise. 4. To remove the bit, proceed in reverse order. Selecting the operating mode or adjusting the torque (fig. 5) The collar of this tool has 15 positions for the adjustment of the torque to suit the size of the screw and the workpiece material. For torque adjustment, refer to Screwdriving. Select the drilling mode or torque by aligning the symbol or number on the collar (e) with the indicator (q) on the housing. Forward/reverse slider (fig. ) To select forward or reverse rotation, use the forward/ reverse slider (b) as shown (see arrows on tool). WARNING: To reduce the risk of personal injury, always wait until the motor has come to a complete standstill before changing the direction of rotation. Two-gear selector (fig. 7) Your tool is fitted with a two-gear selector (f) to vary the speed/torque ratio. 1 low speed/high torque (drilling large holes, driving screws) 2 high speed/low torque (drilling smaller holes) For speed rates, refer to the Technical Data. WARNING: To reduce the risk of personal injury: Always push the two gear selector completely forward or backward. Do not change gears at full speed or during use. Removing and Fitting the Chuck (fig. 8, 9) DW Open the chuck jaws as far as possible. 2. Insert a screwdriver into the chuck and remove the chuck retaining screw by turning clockwise as shown in figure Tighten an hex key into the chuck and strike it with a hammer as shown in figure 9. This will loosen the chuck so that it can be unscrewed by hand. 4. To refit the chuck, proceed in reverse order. Prior to Operation 1. Make sure your battery pack is (fully) charged. 2. Insert the appropriate bit. 3. Mark the spot where the hole is to be drilled. 4. Select forward or reverse rotation. Operation Instructions for Use WARNING: To reduce the risk of personal injury: Always observe the safety instructions and applicable regulations. Be aware of the location of pipework and wiring. Apply only a gentle pressure to the tool. Excessive force does not speed up drilling but decreases tool performance and may shorten tool life. To minimise stalling on break-through, progressively reduce the drill point pressure towards the end of the operation. Keep the motor running when pulling the bit back out of a drilled hole. This will help prevent jamming. Proper Hand Position (fig. 1, 10) WARNING: To reduce the risk of serious personal injury, Always use proper hand position as shown in figure
 1. Open the chuck by turning the sleeve (p) counterclockwise and insert the bit shank. 2.")
15 English WARNING: To reduce the risk of serious personal injury, always hold securely in anticipation of a sudden reaction. Proper hand position requires one hand on top of the housing, with the other hand on the grip (h). Switching on and off (fig. 1, ) 1. To run the tool, press the variable speed switch (a). The pressure exerted on the variable speed switch determines the tool speed. 2. To stop the tool, release the switch. 3. To lock the tool in the off position, move the forward/reverse slider (b) to the central position. WARNING: To reduce the risk of personal injury the drill is equipped with a brake to stop the tool as soon as the variable speed switch is fully released. Drill Operation 1. Select the desired speed/torque range using the gear shifter to match the speed and torque to the planned operation. 2. For Wood, use twist bits, spade bits, power auger bits or hole saws. For Metal, use highspeed steel twist drill bits or hole saws. Use a cutting lubricant when drilling metals. The exceptions are cast iron and brass which should be drilled dry. 3. Always apply pressure in a straight line with the bit. Use enough pressure to keep the drill bit biting, but do not push hard enough to stall the motor or deflect the bit. 4. Hold tool firmly with both hands to control the twisting action of the drill. 5. IF DRILL STALLS, it is usually because it is being overloaded. RELEASE TRIGGER IMMEDIATELY, remove drill bit from work, and determine cause of stalling. DO NOT CLICK TRIGGER OFF AND ON IN AN ATTEMPT TO START A STALLED DRILL THIS CAN DAMAGE THE DRILL.. Keep the motor running when pulling the bit back out of a drilled hole. This will help prevent jamming. Screwdriving (fig. 1) 1. Select forward or reverse rotation using the slider (b). Match the speed and torque to the planned operation. Insert the desired fastener accessory into the chuck as you would any drill bit. 2. Set the collar (d) to position 1 and begin screwdriving (low torque). Make a few practice runs in scrap or unseen areas to determine the proper position of the clutch collar. 3. If the clutch ratchets too soon, adjust the collar to increase the torque as required. Maintenance Your DeWALT power tool has been designed to operate over a long period of time with a minimum of maintenance. Continuous satisfactory operation depends upon proper tool care and regular cleaning. WARNING: To reduce the risk of serious personal injury, turn tool off and disconnect battery pack before making any adjustments or removing/ installing attachments or accessories. An accidental start-up can cause injury. The charger is not serviceable. There are no serviceable parts inside the charger. Lubrication Your power tool requires no additional lubrication. Cleaning Warning: Blow dirt and dust out of the main housing with dry air as often as dirt is seen collecting in and around the air vents. Wear approved eye protection and approved dust mask when performing this procedure. Warning: Never use solvents or other harsh chemicals for cleaning the non-metallic parts of the tool. These chemicals may weaken the materials used in these parts. Use a cloth dampened only with water and mild soap. Never let any liquid get inside the tool; never immerse any part of the tool into a liquid. Charger Cleaning Instructions WARNING: Shock hazard. Disconnect the charger from the AC outlet before cleaning. Dirt and grease may be removed from the exterior of the charger 13
 to the central position.")
16 English using a cloth or soft non-metallic brush. Do not use water or any cleaning solutions. Optional Accessories Warning: Since accessories, other than those offered by DeWalt, have not been tested with this product, use of such accessories with this tool could be hazardous. To reduce the risk of injury, only DeWalt, recommended accessories should be used with this product. Consult your dealer for further information on the appropriate accessories. Protecting the Environment Separate collection. This product must not be disposed of with normal household waste. Rechargeable Battery Pack This long life battery pack must be recharged when it fails to produce sufficient power on jobs which were easily done before. At the end of its technical life, discard it with due care for our environment: Run the battery pack down completely, then remove it from the tool. Li-Ion, NiCd and NiMH cells are recyclable. Take them to your dealer or a local recycling station. The collected battery packs will be recycled or disposed of properly. Should you find one day that your DeWALT product needs replacement, or if it is of no further use to you, do not dispose of it with household waste. Make this product available for separate collection. Separate collection of used products and packaging allows materials to be recycled and used again. Re-use of recycled materials helps prevent environmental pollution and reduces the demand for raw materials. Local regulations may provide for separate collection of electrical products from the household, at municipal waste sites or by the retailer when you purchase a new product. DeWALT provides a facility for the collection and recycling of DeWALT products once they have reached the end of their working life. To take advantage of this service please return your product to any authorised repair agent who will collect them on our behalf. You can check the location of your nearest authorised repair agent by contacting your local DeWALT office at the address indicated in this manual. Alternatively, a list of authorised DeWALT repair agents and full details of our after-sales service and contacts are available on the Internet at: 14

17 kablosuz matkap/tornavida dc733, dc740, dc750, dw907 Türkçe Tebrikler! Bir DeWALT aletini tercih ettiniz. Uzun süreli deneyim, esaslı ürün geliştirme ve yenilik DeWALT ın profesyonel elektrikli alet kullanıcıları için en güvenilir ortaklardan birisi haline gelmesini sağlamaktadır. Teknik Veriler dc733 DC740 DW907 DC750 Voltaj V 14, , Tip Yüksüz hız 1. kademe dev/dak kademe dev/dak Azami tork Nm Mandren kapasitesi mm Çelik/tahtada azami delme kapasitesi mm 10/30 10/25 10/25 10/22 Ağırlık (pil takımı hariç kg 1,1 1,1 1,1 1,1 L PA (ses basıncı) db(a) K PA (ses basıncı belirsizliği) db(a) L WA (ses gücü) db(a) K WA (ses gücü belirsizliği) db(a) 3,3 3,3 3,3 3,3 Toplam titreşim değerleri (üç yönün vektör toplamı) EN 0745 ye göre belirlenmiştir: Yumuşak çelik delme a h,d = m/s² 1,7 1, 1, 1,5 Belirsizlik değeri K = m/s² 1,5 1,5 1,5 1,5 Darbesiz vidalama a h = m/s² 1,3 1,2 1,2 1,1 Belirsizlik değeri K = m/s² 1,5 1,5 1,5 1,5 Bu bilgi sayfasında verilen titreşim emisyon düzeyi, EN 0745 te sağlanan standart teste uygun olarak ölçülmüştür ve aletleri birbiriyle karşılaştırmak için kullanılabilir. Ön maruziyet değerlendirmesi için kullanılabilir. UYARI: Beyan edilen titreşim emisyon düzeyi, aletin ana uygulamalarını yansıtır. Ancak alet farklı aksesuarlarla farklı uygulamalar için kullanılırsa veya bakımı kötü yapılırsa, titreşim emisyonu değişebilir. Bu, toplam çalışma süresindeki maruziyet düzeyini önemli ölçüde artırabilir. Tahmini titreşim maruziyeti, aletin kapalı kaldığı veya çalışmasına karşın iş görmediği zamanları da dikkate almalıdır. Bu, toplam çalışma süresindeki maruziyet düzeyini önemli ölçüde azaltabilir. Operatörü titreşim etkilerinden korumak için şu türde ek güvenlik önlemleri alın: Aletin ve aksesuarların bakımını yapın, elleri sıcak tutun, çalışma modellerini düzenleyin. Pil takımı DE902 DE9074 DE9071 DWCB12 Pil tipi NiCd NiCd NiCd NiCd Voltaj V 9, Kapasite Ah 1,3 1,3 2,0 1,5 Ağırlık kg 0,42 0,5 0,5 0,59 Pil takımı DE9501 DE9502 DE9091 DWCB14 Pil tipi NiMH NiMH NiCd NiCd Voltaj V 12 14,4 14,4 14,4 Kapasite Ah 2, 2, 2,0 1,5 Ağırlık kg 0,58 0,82 0,84 0,73 Pil takımı DE9094 DE9140 DE9141 Pil tipi NiCd Li-İyon Li-İyon Voltaj V 14,4 14,4 14,4 Kapasite Ah 1,3 2,0 1,1 Ağırlık kg 0,4 0,58 0,40 15

18 Türkçe Şarj cihazı DE911 DE9118 DE9135 Pil tipi NiCd/NiMH NiCd NiCd/ NiMH/ Li-İyon Şebeke voltajı V AC Yaklaşık dk şarj süresi (2,0 Ah (2,0 Ah (2,0 Ah pil) pil) pil) Ağırlık kg 0,4 0,9 0,52 Bu ürünler ayrıca 2004/108/EC ve 2011/5/EU Direktifi ile uyumludur. Daha fazla bilgi için, lütfen aşağıdaki adresten DeWALT ile irtibata geçin veya kılavuzun arkasına bakın. Bu belge altında imzası bulunan yetkili, teknik dosyanın derlenmesinden sorumludur ve bu beyanı DeWALT adına vermiştir. Sigortalar: Avrupa 230 V aletler 10 Amper, ana şebeke Tanımlar: Güvenlik Talimatları Aşağıdaki tanımlar her uyarı sözcüğü için ciddiyet derecesini gösterir. Lütfen kılavuzu okuyunuz ve bu simgelere dikkat ediniz. TEHLİKE: Engellenmemesi halinde ölüm veya ciddi yaralanma ile sonuçlanabilecek çok yakın bir tehlikeli durumu gösterir. UYARI: Engellenmemesi halinde ölüm veya ciddi yaralanma ile sonuçlanabilecek potansiyel bir tehlikeli durumu gösterir. DİKKAT: Engellenmemesi halinde önemsiz veya orta dereceli yaralanma ile sonuçlanabilecek potansiyel bir tehlikeli durumu gösterir. İKAZ: Engellenmemesi halinde maddi hasara neden olabilecek, yaralanma ile ilişkisi olmayan durumları gösterir. Elektrik çarpması riskini belirtir. Yangın riskini belirtir. EC Uygunluk Bildirimi MAKİNE DİREKTİFİ DC733, DC740, DC750, DW907 DeWALT, Teknik veriler bölümünde açıklanan bu ürünlerin 200/42/EC, EN , EN ve EN normlarına uygun olarak tasarlandığını beyan eder. Horst Grossmann Başkan Yardımcısı, Mühendislik ve Ürün Geliştirme DeWALT, Richard-Klinger-Straße 11, D-5510, Idstein, Almanya UYARI: Yaralanma riskini azaltmak için, kullanım kılavuzunu okuyun. Genel Elektrikli Alet Güvenlik Uyarıları UYARI! Tüm güvenlik uyarılarını ve tüm talimatları okuyun. Uyarı ve talimatlara uyulmaması elektrik çarpması, yangın ve/veya ciddi yaralanmaya yol açabilir. TÜM UYARI VE TALIMATLARI ILERIDE BAŞVURU AMACIYLA SAKLAYIN Uyarılarda geçen elektrikli alet terimi, ana şebekeden güç alan (kablolu) elektrikli aletinizi veya pil ile çalışan (kablosuz) elektrikli aletinizi ifade etmektedir. 1) ÇALIŞMA ALANININ GÜVENLIĞI a) Çalışma alanını temiz tutun ve iyi ışıklandırın. Karışık veya karanlık bölgeler kazalara yol açabilir. b) Elektrikli aletleri yanıcı sıvılar, gazlar veya toz gibi patlayıcıların bulunduğu ortamlarda kullanmayın. Elektrikli aletler toz veya dumanı ateşleyebilecek kıvılcımlar çıkarmaktadır. c) Bir elektrikli aleti kullanırken çocukları ve etraftaki insanları uzakta tutun. Dikkat dağıtıcı şeyler kontrolü kaybetmenize sebep olabilir. 1

19 Türkçe 2) ELEKTRIK EMNIYETI a) Elektrikli aletin fişleri prize uygun olmalıdır. Fişi hiçbir şekilde değiştirmeyin. Topraklanmış elektrikli aletler ile birlikte adaptör fişlerini kullanmayın. Değiştirilmemiş fişler ve uygun prizler elektrik çarpması riskini azaltacaktır. b) Borular, radyatörler, mutfak ocakları ve buzdolapları gibi topraklanmış yüzeylerle vücudunuzun temas etmesini engelleyin. Vücudunuzun topraklanması halinde elektrik çarpması riski artmaktadır. c) Elektrikli aletleri yağmura veya ıslak koşullara maruz bırakmayın. Bir elektrikli aletin içine giren su, elektrik çarpması riskini artıracaktır. d) Kabloyu başka amaçlarla kullanmayın. Kabloyu hiçbir zaman elektrikli aleti taşımak, sürüklemek veya prizden çekmek üzere kullanmayın. Kabloyu ısı, yağ, keskin köşeler veya hareketli parçalardan uzak tutun. Hasarlı veya dolaşmış kablolar elektrik çarpması riskini artırmaktadır. e) Bir elektrikli aleti dış mekanda kullanırken, dış mekan kullanımına uygun bir uzatma kablosu kullanın. Dış mekan kullanımına uygun bir kablonun kullanılması elektrik çarpması riskini azaltmaktadır. f) Elektrikli aletin nemli ortamda çalışması kaçınılmazsa, bir artık akım cihazı (RCD) korumalı besleme kullanın. RCD kullanımı elektrik çarpma riskini azaltır. 3) KIŞISEL GÜVENLIK a) Bir elektrikli aleti kullanırken tetikte olun, ne yaptığınıza dikkat edin ve sağduyunuzu kullanın. Yorgun olduğunuz zaman veya ilaç, alkol ya da başka tedavi etkisi altında iken elektrikli aleti kullanmayın. Elektrikli aletleri kullanırken bir anlık dikkatsizlik ciddi kişisel yaralanmaya yol açabilir. b) Kişisel koruyucu ekipman kullanın. Her zaman göz koruması kullanın. Uygun koşullarda kullanılan toz maskesi, kaymaz emniyet ayakkabıları, kask veya duyma koruması gibi koruyucu ekipman kişisel yaralanmaları azaltacaktır. c) İstemeyerek çalıştırmaktan kaçının. Güç kaynağını ve/veya pil takımını bağlamadan, aleti yerden kaldırmadan ya da taşımadan önce anahtarın off (kapalı) konumda olduğundan emin olun. Elektrikli aletleri parmağınız anahtar üzerindeyken taşımak veya anahtarı açık konumdaki elektrikli aletleri prize takmak kazalara yol açacaktır. d) Elektrikli aleti açık konuma getirmeden önce varsa ayar anahtarını veya ayarlı penseyi çıkarın. Elektrikli aletin dönen bir parçasına bağlı kalan bir ayarlı pense veya anahtar kişisel yaralanmaya yol açabilir. e) Yetişemeyeceğiniz noktalara uzanmayın. Her zaman için uygun ayak basacak yer bulun ve dengenizi sağlayın. Böylece beklenmeyen durumlarda elektrikli alet daha iyi kontrol edilebilecektir. f) Uygun giysiler giyin. Bol giysiler veya takı kullanmayın. Saçınız, giysileriniz ve eldivenlerinizi hareketli parçalardan uzak tutun. Bol giysiler, takılar veya uzun saç hareketli parçalara takılabilir. g) Toz çekme ve toplama araç-gereçlerinin bağlanması için cihazlar verilmesi halinde, bunların uygun biçimde bağlanması ve kullanılmasını sağlayın. Toz toplama kullanımı tozla ilgili tehlikeleri azaltabilir. 4) ELEKTRIKLI ALETIN KULLANIMI VE BAKIMI a) Elektrikli aleti zorlamayın. Uygulamanız için doğru elektrikli aleti kullanın. Doğru elektrikli alet, tasarlandığı hızda işi daha iyi ve daha güvenli yapacaktır. b) Açma/kapama anahtarı çalışmazsa elektrikli aleti kullanmayın. Anahtar ile kontrol edilemeyen herhangi bir elektrikli alet tehlikelidir ve tamir edilmelidir. c) Herhangi bir ayarlama yapmadan, aksesuvarları değiştirmeden veya elektrikli aletleri saklamadan önce fişi güç kaynağından çekin ve/veya pilleri çıkarın. Bu türlü koruyucu güvenlik önlemleri elektrikli aletin yanlışlıkla çalışması riskini azaltır. d) Boştaki elektrikli aletleri çocukların erişemeyeceği yerlerde muhafaza edin ve elektrikli aleti veya bu talimatları bilmeyen kişilerin elektrikli aleti kullanmasına izin vermeyin. Elektrikli aletler eğitimsiz kullanıcıların elinde çok tehlikelidir. e) Elektrikli aletlerin bakımını yapın. Hareketli parçaların hizalanmasını veya bağlantılarını, parçaların kırık 17
 Elektrikli aletleri yağmura veya ıslak koşullara maruz bırakmayın. Bir elektrikli aletin içine giren su, elektrik çarpması riskini artıracaktır. d) Kabloyu başka amaçlarla kullanmayın.")
20 Türkçe olup olmadığını ve elektrikli aletlerin çalışmasını etkileyebilecek başka koşulları kontrol edin. Hasarlı ise, kullanmadan önce elektrikli aletin tamirini yaptırın. Kazaların pek çoğu, bakımı yapılmayan elektrikli aletlerden kaynaklanmaktadır. f) Kesme aletlerini keskin ve temiz tutun. Bakımı gerektiği şekilde yapılmış keskin uçlu kesme aletlerinin rahatsızlık yaratma olasılığı daha az, kontrolü daha kolaydır. g) Elektrikli el aletini, aksesuvarları ve uçları vb. çalışma şartlarını ve gerçekleştirilecek işi göz önüne alarak bu talimatlara göre kullanın. Elektrikli aletin amacı dışındaki işlemlerde kullanılması tehlikeli durumlara yol açabilir. 5) PIL CIHAZININ KULLANIMI VE BAKIMI a) Sadece imalatçı tarafından belirtilen şarj cihazı ile şarj edin. Bir pil takımı türüne uygun olan bir şarj cihazı, başka bir pil takımı ile kullanıldığında yangın riski ortaya çıkarabilir. b) Elektrikli aletleri sadece özellikle belirtilen pil takımları ile kullanın. Başka pil takımlarının kullanılması yaralanma ve yangın tehlikesi oluşturabilir. c) Kullanılmadığı zamanlarda pil takımını kağıt klipsler, madeni paralar, anahtarlar, çiviler, vidalar veya bir kutup başından diğerine bağlantı yapabilecek diğer küçük metal nesnelerden uzak tutun. Pil kutup başlarının kısa devre yapılması yanıklara veya yangına sebep olabilir. d) Kötü koşullar altında, pilden sıvı çıkabilir, teması önleyin. Yanlışlıkla temas olursa, su ile yıkayın. Sıvı gözlere temas ederse, tıbbi yardım alın. Pilden çıkan sıvı iritasyona veya yanıklara yol açabilir. ) SERVIS a) Elektrikli aletinizin eğitimli bir tamir görevlisi tarafından sadece aynı yedek parçalar kullanılarak tamir edilmesini sağlayın. Bu şekilde elektrikli aletin güvenliği sağlanmış olacaktır. Matkaplar için İlave Özel Güvenlik Kuralları Koruyucu kulaklık kullanın. Gürültüye maruz kalınması, işitme kaybına yol açabilir. Gömülü elektrik kablolarına veya kendi kablosuna temas etmesine yol açabilecek çalışmalarda elektrikli aleti sadece izole edilmiş saplarından tutun. Kesim aksesuarı elektrik akımı bulunan kablolarla temas ettiğinde, akım elektrikli aletin iletken metal parçaları üzerinden operatöre iletilerek elektrik çarpmasına yol açabilir. Kesilecek parçayı sağlam bir yere sabitlemek için işkence veya başka araçlar kullanın. Parçanın elinizle veya vücudunuzu kullanarak tutulması güvenilmezdir ve kontrol kaybına neden olabilir. Koruyucu gözlük veya gözü koruyacak başka araçlar kullanın. Delme işlemleri uçuşan talaşlara neden olur. Uçan parçacıklar kalıcı göz hasarına neden olabilir. Uçlar ve araçlar çalışırken ısınabilir. Bunlara dokunurken eldiven giyin. Makinenin saplarını mutlaka kuru ve temiz tutun ve saplara yağ veya gres bulaşmasını önleyin. Kauçuk eldiven kullanılması tavsiye olunur. Bu sayede aleti daha iyi kontrol edebilirsiniz. Kalan Riskler Aşağıdaki riskler matkap kullanmanın özünde mevcuttur: Aletin dönen veya sıcak parçalarına dokunma sonucu yaralanma. İlgili güvenlik düzenlemelerinin uygulanması ve güvenlik cihazlarının kullanılmasına rağmen, bazı risklerden kaçınmak mümkün değildir. Bunlar: İşitme bozukluğu. Aksesuarları değiştirirken parmakların ezilme tehlikesi. Ahşap malzemeler üzerinde çalışırken meydana gelen tozun yutulması sonucu oluşan sağlık sorunları. Sıçrayan parçacıklardan kaynaklanan yaralanma riski. Uzun süreli kullanımdan kaynaklanan yaralanma riski. Alet Üzerindeki Etiketler Alet üzerinde aşağıdaki resimler bulunmaktadır: Kullanmadan önce kullanım kılavuzunu okuyun. 18

DC733 DC740 DC750 DW907
 www..eu DC733 DC740 DC750 DW907 English (original instructions) 04 Türkçe (orijinal talimatlardan çevrilmiştir) 15 2 Figure 1 c d e f b a m Dc733 DC740 DC750 h n i j DC733, DC740 c d e f b a DW907 h i
English (original instructions) 3. Türkçe (orijinal talimatlardan çevrilmiştir) 15. Copyright DEWALT
 3. Türkçe (orijinal talimatlardan çevrilmiştir) 15. Copyright DEWALT") DCD700 English (original instructions) 3 Türkçe (orijinal talimatlardan çevrilmiştir) 15 Copyright DEWALT 2 Figure 1 e c d h a b i f g Figure 2 g j 1 Figure 3 Figure 4 c f g d Figure 5 Figure 6 Figure
DCD700 English (original instructions) 3 Türkçe (orijinal talimatlardan çevrilmiştir) 15 Copyright DEWALT 2 Figure 1 e c d h a b i f g Figure 2 g j 1 Figure 3 Figure 4 c f g d Figure 5 Figure 6 Figure
GENİŞLEYEN GÜVENLİK KAPISI EXPANDING SAFETY GATE
 GENİŞLEYEN GÜVENLİK KAPISI EXPANDING SAFETY GATE www.odabu.com.tr UYARI MONTAJ VE KULLANIM ÖNCESİ KILAVUZ İÇİNDEKİ TÜM TALİMATLARI OKUYUNUZ KILAVUZU İHTİYAÇ DURUMUNDA KULLANMAK ÜZERE SAKLAYINIZ Güvenlik
Bebek Hamağı Kullanım Kılavuzu Baby Hammock User Guide
 Türk Patent Enstitüsü Tasarım Tescilli 5 Dakikada Kurulum Alman TÜV Rheinland Tarafından Güvenlik Onaylı Bebek Hamağı Kullanım Kılavuzu Baby Hammock User Guide Ürünün kurulum ve kullanımından önce kılavuzu
English Page 3 Turkish Page 7 STDR5510C
 STDR5510C English Page 3 Turkish Page 7 ENGLISH (Original instructions) 6 4 3 7 A 1 2 B 5 C D 3 E F 2 (Original instructions) ENGLISH Technical data Intended use Your STANLEY rotary drill has been designed
H48.33b FILTER DRIER SHELLS KARTUŞ KOVANLARI. H48.33b.54.1
 H48.33b H48.33b.54.1 Introduction Filter drier shells are important equipments for refrigeration and air conditioning systems. They are designed to be used in the suction line and liquid line. Filter drier
HIGH SPEED PVC DOOR INSTALLATION BOOK
 HIGH SPEED PVC DOOR INSTALLATION BOOK HIZLI PVC KAPI MONTAJ KLAVUZU MODEL FUD 2015.01 MONTAJ KLAVUZU/INSTALLATION BOOK INTRODUCTION The information contained in this manual will allow you to install your
KULLANMA KLAVUZU / USER'S GUIDE GTİP/HS Code:
 MOTORLU ÇOKLU ASTAR KESME MAKİNESİ MOTOR DRIVEN LINING CUTTING MACHINE KULLANMA KLAVUZU / USER'S GUIDE GTİP/HS Code: 8461.90.00.00.00 Çelik Kuyumculuk Kalıp Makine San. Ve Tic. Ltd. Şti. Adres: Atatürk
English Page 4 Turkish Page 13 STHM5
 STHM5 English Page 4 Turkish Page 13 ENGLISH (Original instructions) Figure 1 d c e b a b A B a d f d 2 (Original instructions) ENGLISH Figure 2 f g Figure 3 Figure 4 1 3 ENGLISH (Original instructions)
ŞARJLI MATKAP MODEL RTM306 TANITMA VE KULLANIM KILAVUZU
 ŞARJLI MATKAP MODEL RTM306 TANITMA VE KULLANIM KILAVUZU 4 6 7 1 2 5 3 CİHAZIN ÜNİTELERİ 1. UÇ TUTUCU 2. AYDINLATMA IŞIĞI 3. AÇMA / KAPAMA ŞALTERİ 4. TORK KONTROL 5. YÖN DEĞİŞTİRME 6. ŞARJ SEVİYE IŞIĞI
24kV,630A Outdoor Switch Disconnector with Arc Quenching Chamber (ELBI) IEC IEC IEC 60129
 IEC IEC IEC 60129") 24kV,630 Outdoor Switch Disconnector with rc Quenching Chamber (ELBI) IEC265-1 IEC 694 IEC 129 Type ELBI-HN (24kV,630,normal) Closed view Open view Type ELBI-HS (24kV,630,with fuse base) Closed view Open
24kV,630 Outdoor Switch Disconnector with rc Quenching Chamber (ELBI) IEC265-1 IEC 694 IEC 129 Type ELBI-HN (24kV,630,normal) Closed view Open view Type ELBI-HS (24kV,630,with fuse base) Closed view Open
Çelik Kuyumculuk Kalıp Makine San. Ve Tic. Ltd. Şti.
 Çelik Kuyumculuk Kalıp Makine San. Ve Tic. Ltd. Şti. Fabrika Adres: Atatürk Mahallesi Marmara Sanayi Sitesi L Blok No: 3 İkitelli / İstanbul Türkiye Telefon: +90 212 494 44 60 Fax: +90 212 494 44 61 E-mail
English Page 4 Turkish Page 14 STDH7213C
 STDH7213C English Page 4 Turkish Page 14 ENGLISH (Original instructions) 4 5 9 7 2 8 6 3 1 10 0000 00-00 A 13 B 4 2 (Original instructions) ENGLISH 7 6 C 12 D E 3 ENGLISH (Original instructions) Intended
KIRICI VE DELİCİ MATKAP
 KIRICI VE DELİCİ MATKAP MODEL RTM232 TANITMA VE KULLANIM KILAVUZU 3 4 5 1 6 2 CİHAZIN ÜNİTELERİ 1. MANDREN 2. YAN SAP 3. KIRICI DELİCİ SEÇİM ANAHTARI 4. YAĞ KAPAĞI 5. ANAHTAR 6. DEVİR AYARI NOT: BU ÜRÜN
63A - 125A CEE NORM FİŞ & PRİZLER 63A - 125A CEE NORM PLUGS & SOCKETS. connectors
 63A - 125A CEE NORM FİŞ & PRİZLER 63A - 125A CEE NORM PLUGS & SOCKETS connectors 38 63A - 125A CEE NORM FİŞ & PRİZLER 63A - 125A CEE NORM PLUGS & SOCKETS connectors Mermer ocakları ve maden ocakları, limanlar
Thunderbird Saç Kurutma Makinesi
 Model No: K 054 Thunderbird Saç Kurutma Makinesi / Hair Dryer Kullanma Kılavuzu / Instruction Manual K 054 Thunderbird Saç Kurutma Makinesi MAIN PARTS 1 3 4 2 5 6 7 1. Brush 2. Brush Rotary on/off switch
ZIMPARA TAŞ MOTORU MODEL RTM415A RTM417A RTM420A TANITMA VE KULLANIM KILAVUZU
 ZIMPARA TAŞ MOTORU MODEL RTM415A RTM417A RTM420A TANITMA VE KULLANIM KILAVUZU CİHAZIN ÜNİTELERİ 1. AÇMA /KAPAMA ŞALTERİ 2. İŞ PARÇASI TABLASI 3. KIVILCIM/ÇAPAK KORUYUCU 4. ZIMPARA TAŞI 5. ZIMPARA TAŞI
PCC 6505 PROFILE CUTTING LINE
 PCC 6505 PROFILE CUTTING LINE 1.DESCRIPTION PCC 6505 is a servo controlled machine which is specifically designed for the serial cutting of any kind of PVC and aluminum s in the market. The machine is
AKE Bulaşık Yıkama Makinası Kontrol Kartı Kullanım Kılavuzu Dishwasher Controller User Manual TR EN
 Bulaşık Yıkama Makinası Kontrol Kartı Kullanım Kılavuzu Dishwasher Controller User Manual Bulaşık Yıkama Makinası Kontrol Kartı Kullanım Kılavuzu (7 SEG SIMPLE YATAY TİP) AKE-BYM-102 Lütfen bu kullanım
ELDAŞ Elektrik Elektronik Sanayi ve Tic.A.Ş.
 Sayfa (Page): 2/9 LVD Deney Raporu LVD Testing Report İÇİNDEKİLER (Contents) 1 Dokümantasyon Sayfa (Documentation) 1.1 DGC, Çevre Koşulları ve Sembollerin Tanımları 3 (Conditions/Power Utilized,Description
GD 910 Operating Instructions
 GD 910 Operating Instructions 107402565 A 2 English... 8 Deutsch... 10 Français... 12 Nederlands... 14 Italiano... 16 Norsk... 18 Svenska... 20 Dansk... 22 Suomi... 24 Español... 26 Português... 28 Eλληνικά...
 ENG ENG 2 3 ENG ENG 4 5 ENG ENG 6 7 ENG ENG 8 RU RU 10 11 RU RU 12 13 RU RU 14 15 RU RU 16 EST EST 18 19 EST EST 20 21 EST EST 22 23 EST EST 24 LT LT 26 27 LT LT 28 29 LT LT 30 31 LT LT 32 LV LV 34 35
VHR ER ENERJİ GERİ KAZANIM CİHAZLARI VHR ER ENERGY RECOVERY UNITS
 ER ENERJİ GERİ KAZANIM CİHAZLARI ER ENERGY RECOVERY UNITS AKSESUARLAR ACCESSORIES Sayfa/Page 9~ VENCO ER enerji geri kazanım cihazları, rotorlu tip eşanjörü sayesinde, yüksek enerji tasarrufu sağlamak
ŞARJLI MATKAP MODEL RTM315 TANITMA VE KULLANIM KILAVUZU
 ŞARJLI MATKAP MODEL RTM315 TANITMA VE KULLANIM KILAVUZU CİHAZIN ÜNİ TELERİ 1. ANAHTARSIZ MANDREN 2. TORK AYAR YERİ 3. SAĞ / SOL AYAR DÜĞMESİ 4. HIZ AYARLI TETİK 5. BATARYA SÖKME TAKMA PİMİ 6. BATARYA KASASI
English Page 3 Turkish Page 10 STHR263
 STHR263 English Page 3 Turkish Page 10 ENGLISH (Original instructions) 2 (Original instructions) ENGLISH A B C * the picture above may differ slightly to actual unit. 3 ENGLISH (Original instructions)
aircoolers Evaporatörler Aircoolers TAVAN TİPİ EVAPORATÖRLER CEILING TYPE AIR COOLERS DUVAR TİPİ EVAPORATÖRLER WALL TYPE AIR COOLERS
 aircoolers Evaporatörler Aircoolers CEILING TYPE AIR COOLERS Teknik Bilgiler / Technical Details UYGULAMA Ürünlerimiz, endüstriyel ve ticari soğuk muhafaza, donmuş muhafaza, şoklama hücreleri ve serinletilme
TANITIM VE KULLANMA KILAVUZU
 ELEKTRİKLİ MATKAP MODEL RTM154 TANITIM VE KULLANMA KILAVUZU 6 1 2 4 5 3 CİHAZIN ÜNİTELERİ 1. MANDREN 2. HAVALANDIRMA ARALIKLARI 3. GERİ/İLERİ DÖNÜŞ ŞALTERİ 4. AÇMA / KAPAMA ŞALTERİ 5. AÇMA / KAPAMA ŞALTERİ
İthalatçı / Üretici Firma: BSH Ev Aletleri Sanayi ve Ticaret A.Ş., Fatih Sultan Mehmet Mahallesi, Balkan Caddesi No: 51, Ümraniye, İstanbul,
 İthalatçı / Üretici Firma: BSH Ev Aletleri Sanayi ve Ticaret A.Ş., Fatih Sultan Mehmet Mahallesi, Balkan Caddesi No: 51, 34771 Ümraniye, İstanbul, TURKEY T: 216 528 90 00 F: 216 528 99 99 E: info@profilo.com.tr
BVCD DÝKDÖRTGEN HAVA DAMPERÝ ( BVCD) RECTANGULAR VOLUME CONTROL DAMPER
 RECTANGULAR VOLUME CONTROL DAMPER") DÝKDÖRTGEN HAVA DAMPERÝ ( ) RECTANGULAR VOLUME CONTROL DAMPER Dikdörtgen Hava Damperi Teknik Detaylarý Rectangular Volume Control Damper Technical Details : Malzeme: Ürün kasa ve kanatlarýnýn tamamý ekstrüzyon
DÝKDÖRTGEN HAVA DAMPERÝ ( ) RECTANGULAR VOLUME CONTROL DAMPER Dikdörtgen Hava Damperi Teknik Detaylarý Rectangular Volume Control Damper Technical Details : Malzeme: Ürün kasa ve kanatlarýnýn tamamý ekstrüzyon
AKE.ZR Yıkama Durulama Zaman Rölesi Kullanım Kılavuzu Washing and Rinse Time Relay User Manual TR EN
 Yıkama Durulama Zaman Rölesi Kullanım Kılavuzu Washing and Rinse Time Relay User Manual YIKAMA DURULAMA ZAMAN RÖLESİ Kullanım Kılavuzu Lütfen bu kullanım kılavuzunu cihazın montajını yapmadan ve cihazı
English Page 3 (Original instructions) Turkish Page 11 CD121K CD961. Çevirisi orijinal talimatlardan yapılmıştır. www.blackanddecker.com.
 Turkish Page 11 CD121K CD961. Çevirisi orijinal talimatlardan yapılmıştır. www.blackanddecker.com.") 4 3 2 1 9 6 5 English Page 3 (Original instructions) Turkish Page 11 Çevirisi orijinal talimatlardan yapılmıştır www.blackanddecker.com.tr CD121K CD961 ENGLISH 13 11 12 5 6 A B 14 5 8 C D 7 15 3 9 10 E
4 3 2 1 9 6 5 English Page 3 (Original instructions) Turkish Page 11 Çevirisi orijinal talimatlardan yapılmıştır www.blackanddecker.com.tr CD121K CD961 ENGLISH 13 11 12 5 6 A B 14 5 8 C D 7 15 3 9 10 E
Seri kablo bağlantısında Windows95/98/ME'ten Windows 2000'e bağlantı Windows95/98/ME - NT4 bağlantısına çok benzer.
 Seri kablo bağlantısında Windows95/98/ME'ten Windows 2000'e bağlantı Windows95/98/ME NT4 bağlantısına çok benzer. Direkt Kablo desteğini Windows95/98'e yükledikten sonra, Windows95 for Direct Cable Client
www.tpelectric.com.tr MINIBOX MINIBOX
 MINIBOX MINIBOX Minibox Kulplu Minibox with Handle Minibox with Hanger - Fuse Module Minibox Askılı - Sigorta Modüllü 27 MINIBOX 215x215 ölçüsüne sahip MINIBOX serisi ürünler özellikle fabrika, tekstil,
GD 911 Battery Operating Instructions
 GD 911 Battery Operating Instructions 107402566 A 02 English... 8 Deutsch... 12 Français... 16 Nederlands... 20 Italiano... 24 Norsk... 28 Svenska... 32 Dansk... 36 Suomi... 40 Español... 44 Português...
www.cagsanmerdiven.com - bilgi@cagsanmerdiven.com.tr
 Kurulum Kılavuzu Introduction Manuel YAY MONTAJ VİDALARI ZİNCİR KİLİT BRAKETİ SPRING ASSEMBLY SCREWS CHAIN LINK CATCH BRACKET AHŞAP ÇATI MERDİVENİ WOODEN LOFT LADDER www.cagsanmerdiven.com - bilgi@cagsanmerdiven.com.tr
AE-AH SERİSİ MONTAJ KILAVUZU/ AE-AH SERIES INSTALLATION MANUAL
 AE-AH SERİSİ MONTAJ KILAVUZU/ AE-AH SERIES INSTALLATION MANUAL 5 8 9 10 1 2 3 4 6 7 11 1-Tepe adaptörü-top adaptor 6- Ara boru bağlantı vidası- Profile connection screws 2-Ara adaptör- Adaptor 7- Yelken
MPID MPID MOISTURE PROBE INDICATOR NEM PROBU İNDİKATÖR EKRANI DISPLAY NEM PROBU İNDİKATÖR EKRANI MOISTURE PROBE INDICATOR DISPLAY
 MPID MPID NEM PROBU İNDİKATÖR NEM PROBU İNDİKATÖR EKRANI EKRANI MOISTURE PROBE INDICATOR MOISTURE PROBE INDICATOR DISPLAY DISPLAY Döküman Kodu: Document Code: OZB.M.MPID Revizyon No-Tarih: Revision No-Date:
RCT 108 Turbo. fiarjl El Süpürgesi - Kullanma K lavuzu. Rechargeable Cleaner - Instruction Manual
 RCT 108 Turbo fiarjl El Süpürgesi - Kullanma K lavuzu Rechargeable Cleaner - Instruction Manual Giriş Uzun yıllar sorunsuz çalışması için tasarlanan ve üretilen bu ürünü satın aldığınız için teşekkür
ÇEVRESEL TEST HİZMETLERİ 2.ENVIRONMENTAL TESTS
 ÇEVRESEL TEST HİZMETLERİ 2.ENVIRONMENTAL TESTS Çevresel testler askeri ve sivil amaçlı kullanılan alt sistem ve sistemlerin ömür devirleri boyunca karşı karşıya kalabilecekleri doğal çevre şartlarına dirençlerini
Teknoloji Servisleri; (Technology Services)
") Antalya International University Teknoloji Servisleri; (Technology Services) Microsoft Ofis Yazılımları (Microsoft Office Software), How to Update Office 365 User Details How to forward email in Office
Antalya International University Teknoloji Servisleri; (Technology Services) Microsoft Ofis Yazılımları (Microsoft Office Software), How to Update Office 365 User Details How to forward email in Office
MODEL RTM925 TANITMA VE KULLANIM KILAVUZU
 ELEKTRİKLİ ÇİT BUDAMA MODEL RTM925 TANITMA VE KULLANIM KILAVUZU TEKNİK ÖZELLİKLER -RTM925- VOLTAJ 230V~50HZ GİRİŞ GÜCÜ 710W BIÇAK UZUNLUĞU 530MM DEVİR HIZI 1600 R/MİN DİŞ ARALIĞI 20MM MAX KESİLECEK ÇALI
English Page 3 Turkish Page 1 STHR272
 STHR272 English Page 3 Turkish Page 1 ENGLISH (Original instructions) 5 5 3 A B 7 1 6 C 5 3 2 9 4 7 10 1 8 6 XXXX XX JN D 12 8 E 11 11 2 * The picture above may differ slightly to actual unit. 2 (Original
ENGLISH (Original instructions) SSS310. English Page 4 Türkçe Page 9
 SSS310. English Page 4 Türkçe Page 9") ENGLISH (Original instructions) 1 SSS310 English Page 4 Türkçe Page 9 ENGLISH (Original instructions) Fig A 2 (Original instructions) ENGLISH Fig B Fig C 5 5 3 4 7 Fig D 5 3 8 9 Fig E 3 ENGLISH (Original
ENGLISH (Original instructions) 1 SSS310 English Page 4 Türkçe Page 9 ENGLISH (Original instructions) Fig A 2 (Original instructions) ENGLISH Fig B Fig C 5 5 3 4 7 Fig D 5 3 8 9 Fig E 3 ENGLISH (Original
Sirkülasyon Pompaları
 Sirkülasyon Pompaları Circulation Pumps Dünyayı koruyan teknolojilerle daha konforlu bir hayat için çalışıyoruz.. Dünyanın önde gelen markaları, uzmanları, bilim insanları ve profesyonel kadroları, gelişen
English Page 4 Turkish Page 11 STHM10
 STHM10 English Page 4 Turkish Page 11 ENGLISH (Original instructions) FIG A 5 6 4 2 3 1 10 FIG A1 FIG A2 8 6 B 7 A 2 (Original instructions) ENGLISH FIG B 8 9 FIG C FIG D 4 3 ENGLISH (Original instructions)
1 - CANTEK köşe parçasını şekilde gösterildiği gibi yerleştirin;
 1 - CANTEK köşe parçasını şekilde gösterildiği gibi yerleştirin; Insert CANTEK Corner Piece as shown.. 2 - CANTEK Köşe parçalarını 4 köşeye yerleştirilerek şekildeki gibi çerçeve elde edin. Kanal kesitinin
English(Original) Page 3 Turkish Page 11 STPT0900
 Page 3 Turkish Page 11 STPT0900") STPT0900 English(Original) Page 3 Turkish Page 11 ENGLISH (Original instructions) E F D C A B 1 2 3 4 5 2 (Original instructions) ENGLISH 6 7 8 3 ENGLISH (Original instructions) Intended use Your STANLEY
STPT0900 English(Original) Page 3 Turkish Page 11 ENGLISH (Original instructions) E F D C A B 1 2 3 4 5 2 (Original instructions) ENGLISH 6 7 8 3 ENGLISH (Original instructions) Intended use Your STANLEY
English (original instructions) 4. Türkçe (orijinal talimatlardan çevrilmiştir) 13. Copyright DeWALT
 4. Türkçe (orijinal talimatlardan çevrilmiştir) 13. Copyright DeWALT") D25123 D25124 English (original instructions) 4 Türkçe (orijinal talimatlardan çevrilmiştir) 13 Copyright DeWALT 2 Figure 1 c d n g f m i a e b k j D25123 D25124 h Figure 2 d e 1 Figure 3 Figure 4 f g
D25123 D25124 English (original instructions) 4 Türkçe (orijinal talimatlardan çevrilmiştir) 13 Copyright DeWALT 2 Figure 1 c d n g f m i a e b k j D25123 D25124 h Figure 2 d e 1 Figure 3 Figure 4 f g
KIRICI DELİCİ MATKAP MODEL RTM215 TANITMA VE KULLANIM KILAVUZ
 KIRICI DELİCİ MATKAP MODEL RTM215 TANITMA VE KULLANIM KILAVUZ 1 3 4 5 7 6 2 8 CİHAZIN ÜNİTELERİ 1. SDS UÇ MANDRENİ 2. İLAVE SAP 3. DERİNLİK MESNEDİ SIKIŞTIRMA VİDASI 4. DARBELİ / DARBESİZ SEÇİM ANAHTARI
D 10YB. Angle Drill Köşe matkabı. Handling instructions Kullanım talimatları
 Angle Drill Köşe matkabı D 10YB Read through carefully and understand these instructions before use. Aleti kullanmadan önce bu kılavuzu iyice okuyun ve talimatları anlayın. Handling instructions Kullanım
User s Manual Care and Safety Information
 User s Manual Care and Safety Information 1. Keep the device and packaging materials out of the reach of infants and children. 2. Avoid subjecting the power adapter and other contacts to dripping or splashing
ÖRNEKTİR - SAMPLE. RCSummer Ön Kayıt Formu Örneği - Sample Pre-Registration Form
 RCSummer 2019 - Ön Kayıt Formu Örneği - Sample Pre-Registration Form BU FORM SADECE ÖN KAYIT FORMUDUR. Ön kaydınızın geçerli olması için formda verilen bilgilerin doğru olması gerekmektedir. Kontenjanımız
ELECTRONİC CAT & DOG REPELLER
 RH 1500 REPEL RH 1500 ELECTRONİC CAT & DOG REPELLER Repel kedi köpek hayvan kovucu 1500 m2 bir alanı etkileyecek şekilde tasarlanmış son derece başarılı bir cihazdır. Sesi ortama 260 Derece emisyon açısı
TAV FIRINI/ANNEALING FURNACE KULLANMA KLAVUZU / USER'S GUIDE
 TAV FIRINI/ANNEALING FURNACE KULLANMA KLAVUZU / USER'S GUIDE GTİP/HS Code: 8454.10.00.00.00 Çelik Kuyumculuk Kalıp Makine San. Ve Tic. Ltd. Şti. Adres: Atatürk Mahallesi Marmara Sanayi Sitesi R Blok No:
LISA AR 5028 XL SAÇ MAŞASI AR 5028 XL CURLING IRON AR 5028 XL LOCKENSTAB KULLANMA KILAVUZU INSTRUCTION MANUAL GEBRAUCHSANWEISUNG 52 W
 LISA AR 5028 XL SAÇ MAŞASI AR 5028 XL CURLING IRON AR 5028 XL LOCKENSTAB KULLANMA KILAVUZU INSTRUCTION MANUAL GEBRAUCHSANWEISUNG 52 W EN LISA AR 5028 XL CURLING IRON 1- Ceramic covered 32 mm curling iron
Hi-Res Audio/DNC Headset MDR-NC750
 Kullanım kılavuzu Hi-Res Audio/DNC Headset MDR-NC750 İçindekiler Başlarken... 3 Giriş... 3 Genel bakış... 3 Temel konuları öğrenme...4 Mikrofonlu kulaklık setini takma... 4 Mikrofonlu kulaklık setinizi
English (original instructions) 4. Türkçe (orijinal talimatlardan çevrilmiştir) 13. Copyright DeWALT
 4. Türkçe (orijinal talimatlardan çevrilmiştir) 13. Copyright DeWALT") D25123 D25124 English (original instructions) 4 Türkçe (orijinal talimatlardan çevrilmiştir) 13 Copyright DeWALT 2 Figure 1 c d n g f m i a e b k j D25123 D25124 h Figure 2 d e 1 Figure 3 Figure 4 f g
D25123 D25124 English (original instructions) 4 Türkçe (orijinal talimatlardan çevrilmiştir) 13 Copyright DeWALT 2 Figure 1 c d n g f m i a e b k j D25123 D25124 h Figure 2 d e 1 Figure 3 Figure 4 f g
Seviye Kontrol Flatörleri Level Control Float Switches
 Seviye Kontrol Flatörleri Seviye Kontrol Flatörleri Serisi Seviye Kontrol Flatörleri Genel Özellikler ve Teknik Bilgiler 03 Boyutlar 05 Series Level Control Float Switches General Specifications and Technical
Zest. : Shower Unit (Flat) Kompakt Duş Ünitesi (Flat) Description Tan m. : 90x90. Size / Ebat (cm) : 2.5. Depth / Derinlik (cm) Weight / A rl k (kg)
 Kompakt Duş Ünitesi (Flat) Description Tan m. : 90x90. Size / Ebat (cm) : 2.5. Depth / Derinlik (cm) Weight / A rl k (kg)") Zest Description Tan m : Shower Unit (Flat) Kompakt Duş Ünitesi (Flat) Left/Sol Right/Sağ Size / Ebat (cm) : 90x90 Depth / Derinlik (cm) : 2.5 Weight / A rl k (kg) : min. 75 max. 90 Height / Yükseklik
Zest Description Tan m : Shower Unit (Flat) Kompakt Duş Ünitesi (Flat) Left/Sol Right/Sağ Size / Ebat (cm) : 90x90 Depth / Derinlik (cm) : 2.5 Weight / A rl k (kg) : min. 75 max. 90 Height / Yükseklik
VRE SERS ELEKTRONK TERMK RÖLELER VRE SERIES ELECTRONIC THERMAL OVERLOAD RELAY
 VRE SERS ELEKTRONK TERMK RÖLELER VRE SERIES ELECTRONIC THERMAL OVERLOAD RELAY Teknik Özellikler 1.Standartlar : IEC 60947-4-1, TS EN 60947-4-1 2.Depolama Sıcaklıı : - 40 0 C +70 0 C 3.Çalıma Sıcaklıı :
Neon. Description Tan m. : Offset (left) Ofset (sol) Size / Ebat (cm) : 170x75/50. Height / Yükseklik (cm) : 56. Weight / A rl k (kg) : 18
 Ofset (sol) Size / Ebat (cm) : 170x75/50. Height / Yükseklik (cm) : 56. Weight / A rl k (kg) : 18") Neon Description Tan m Size / Ebat (cm) Height / Yükseklik (cm) Weight / A rl k (kg) Front Panel Weight / Ön panel a rl (kg) Side Panel Weight / Yan panel a rl (kg) Volume / Su hacmi (lt) Available massage
Neon Description Tan m Size / Ebat (cm) Height / Yükseklik (cm) Weight / A rl k (kg) Front Panel Weight / Ön panel a rl (kg) Side Panel Weight / Yan panel a rl (kg) Volume / Su hacmi (lt) Available massage
English Page 3 Turkish Page 13 STDR5206
 STDR5206 English Page 3 Turkish Page 13 ENGLISH (Original instructions) FIG. A 3 1 2 6 4 5 FIG. B FIG. C 4 5 5 FIG. D FIG. E 7 8 1 5 6 2 (Original instructions) ENGLISH FIG. F 2 7 8 9 FIG. G 1 2 10 FIG.
CNC MACH breakout board user manual V8 type
 CNC MACH breakout board user manual V8 type 1 Catalogue CNC Router breakout board V8 type user manual... Hata! Yer işareti tanımlanmamış. 1) Brief introduction:...3 2) Breakout board drawing:...4 3) Wiring:...5
PRİZ KOLYE Clamp Saddles
 PRİZ PR!Z KOLYE KOLYE C!VATALI!"#&'( (,' -%$.'/)!"#&'( (! *'01% "$'!.%3+1, /&%!.") #&4!.%)%,,((!"#&'( (,' -%$.'/) #&4!.%)%,,(( (!Ambalaj *'01% "$'!.%3+1, Adedi D x G /&%!.")!"#&'( 9111 x ½ 918 1 x ¾ 911
Elektrikli Aktütör Bağlantı Şemaları
 Elektrikli Aktütör Bağlantı Şemaları Elektrik Şeması / Wiring Diagram O / OFF Type for 0 / 220 V AC O.. FB CS Tam açık uyarı (lamba) Fully open indicator (lamp) Tam kapalı uyarı (lamba) Fully closed indicator
HAVA ÜFLEME MAKİNASI
 HAVA ÜFLEME MAKİNASI MODEL RTM301 TANITMA VE KULLANIM KILAVUZU 1 2 3 5 CİHAZIN ÜNİTELERİ 4 1. HIZ AYAR DÜĞMESİ 2. TETİK KİLİTLEME BUTONU 3. ÇALIŞTIRMA ANAHTARI 4. HAVA EMİŞ YERİ 5. HAVA ÜFLEME BORUSU TEKNİK
ELEKTRİKLİ AĞAÇ KESME MAKİNASI MODEL RTM902 TANITMA VE KULLANIM KILAVUZU
 ELEKTRİKLİ AĞAÇ KESME MAKİNASI MODEL RTM902 TANITMA VE KULLANIM KILAVUZU 9 8 1 4 5 3 6 2 7 10 CİHAZIN ÜNİTELERİ 1. ELEKTRİK KABLOSU 2. TUTMA KOLU 3. EL SİPERİ(FREN KOLU) 4. ÖN TUTMA KOLU 5. KLAVUZ 6. TESTERE
STGL2018 STGL2218. English Page 5 Turkish Page 14
 STGL2018 STGL2218 English Page 5 Turkish Page 14 ENGLISH (Original instructions) 2 1 4 A 3 3 6 5 20 7 B C1 2 (Original instructions) ENGLISH 10 8 10 8 6 7 6 9 7 10 8 6 7 C2 3 C3 10 11 90 o D 10 4 E 3 ENGLISH
STGL2023 STGL2223. English Page 5 Turkish Page 14
 STGL2023 STGL2223 English Page 5 Turkish Page 14 ENGLISH (Original instructions) 2 1 4 A 3 3 6 5 20 7 B C1 2 (Original instructions) ENGLISH 10 8 10 8 6 7 6 9 7 10 8 6 7 C2 3 C3 10 11 90 o D 10 4 E 3 ENGLISH
BDGL2218. www.blackanddecker.com.tr
 TR EN www.blackanddecker.com.tr BDGL2218 ENGLISH (Original instructions) 2 1 4 A 3 3 6 5 20 7 B C1 2 (Original instructions) ENGLISH 10 8 10 8 6 7 6 9 7 10 8 6 7 C2 3 C3 10 11 90 o D 10 4 E 3 ENGLISH (Original
Hakkımızda / About Us... Tunç Makina 1980'den günümüze imal ettiği Eksantrik Presler de kullanmış olduğu,kaliteli malzemelerle imalatını uygulayarak,k
 Hakkımızda / About Us... Tunç Makina 1980'den günümüze imal ettiği Eksantrik Presler de kullanmış olduğu,kaliteli malzemelerle imalatını uygulayarak,kendi alanında daima en iyiyi amaç edinmiştir. Kaliteli
AKDENİZ ÜNİVERSİTESİ MÜHENDİSLİK FAKÜLTESİ ÇEVRE MÜHENDİSLİĞİ BÖLÜMÜ ÇEV181 TEKNİK İNGİLİZCE I
 AKDENİZ ÜNİVERSİTESİ MÜHENDİSLİK FAKÜLTESİ ÇEVRE MÜHENDİSLİĞİ BÖLÜMÜ ÇEV181 TEKNİK İNGİLİZCE I Dr. Öğr. Üyesi Firdes YENİLMEZ KTS Kredisi 3 (Kurumsal Saat: 2 Uygulama Saat: 1) Ders Programı Pazartesi 09:30-12:20
econn (Supplier Portal) of the MANN+HUMMEL Group
 of the MANN+HUMMEL Group") econn (Supplier Portal) of the MANN+HUMMEL Group October 2016 1 econn CONNECTED FOR SUCCESS Support If you have any questions or technical issues during the registration please contact: Teknik sorularınız
econn (Supplier Portal) of the MANN+HUMMEL Group October 2016 1 econn CONNECTED FOR SUCCESS Support If you have any questions or technical issues during the registration please contact: Teknik sorularınız
Yüz Tanımaya Dayalı Uygulamalar. (Özet)
") 4 Yüz Tanımaya Dayalı Uygulamalar (Özet) Günümüzde, teknolojinin gelişmesi ile yüz tanımaya dayalı bir çok yöntem artık uygulama alanı bulabilmekte ve gittikçe de önem kazanmaktadır. Bir çok farklı uygulama
4 Yüz Tanımaya Dayalı Uygulamalar (Özet) Günümüzde, teknolojinin gelişmesi ile yüz tanımaya dayalı bir çok yöntem artık uygulama alanı bulabilmekte ve gittikçe de önem kazanmaktadır. Bir çok farklı uygulama
DARBELİ MATKAP MODEL RTM151 TANITMA VE KULLANIM KILAVUZU
 DARBELİ MATKAP MODEL RTM151 TANITMA VE KULLANIM KILAVUZU CİHAZIN ÜNİTELERİ 1. MANDREN 2. ÇALIŞTIRMA ANAHTARI 3. DEVİR AYARI 4. SAĞ SOL MANDALI 5. ANAHTAR KİLİTLEME BUTONU 6. HAVALANDIRMA ARALIKLARI TEKNİK
Li-Ion Akkupack. Kullanma Kılavuzu Güvenlik açıklamaları
 Li-Ion Akkupack Kullanma Kılavuzu Güvenlik açıklamaları STABILA Lityum İyon Akü Kartuşu ve AC Adaptörü Kullanma Kılavuzu Önemli uyarılar Güvenlik uyarılarını ve Kullanma Kılavuzunu dikkatlice okuyun. Bu
IDENTITY MANAGEMENT FOR EXTERNAL USERS
 1/11 Sürüm Numarası Değişiklik Tarihi Değişikliği Yapan Erman Ulusoy Açıklama İlk Sürüm IDENTITY MANAGEMENT FOR EXTERNAL USERS You can connect EXTERNAL Identity Management System (IDM) with https://selfservice.tai.com.tr/
Track & Track Accessories
 Track & Track Accessories Track liberates light and luminaires from the constraints of rigid mounting of ceiling base and allows architects to create different designs in inner spaces. Different spotlights
FACE CLEANSING PRO AR 5012 SONİC CİLT BAKIM SETİ AR 5012 SKIN TREATMENT EQUIPMENT KULLANMA KILAVUZU INSTRUCTION MANUAL 3,7 V DC
 AR 5012 SONİC CİLT BAKIM SETİ FACE CLEANSING PRO AR 5012 SKIN TREATMENT EQUIPMENT KULLANMA KILAVUZU INSTRUCTION MANUAL 3,7 V DC ARZUM BELLISSIMA FACECLEANSING PRO AR 5012 SONİC SKIN TREATMENT EQUIPMENT
FLEXIBLE AIR DUCT PRODUCTION LINE
 FLEXIBLE AIR DUCT PRODUCTION LINE İnterflex ALPHA INSULATED & NON-INSULATED ALUMINUM NEGATIVE PRESSURE COMPETENT FLEXIBLE AIR DUCTS Insulated & non-insulated aluminum negative pressure competent flexible
English (Original instructions) 6 Türkçe (Çevirisi orijinal talimatlardan yapılmıştır) 12
 6 Türkçe (Çevirisi orijinal talimatlardan yapılmıştır) 12") DW341(K) English (Original instructions) 6 Türkçe (Çevirisi orijinal talimatlardan yapılmıştır) 12 3 4 5 JIGSAW DW341(K) Congratulations! You have chosen a DEWALT tool. Years of experience, thorough product
DW341(K) English (Original instructions) 6 Türkçe (Çevirisi orijinal talimatlardan yapılmıştır) 12 3 4 5 JIGSAW DW341(K) Congratulations! You have chosen a DEWALT tool. Years of experience, thorough product
Delta Pulse 3 Montaj ve Çalıstırma Kılavuzu. www.teknolojiekibi.com
 Delta Pulse 3 Montaj ve Çalıstırma Kılavuzu http:/// Bu kılavuz, montajı eksiksiz olarak yapılmış devrenin kontrolü ve çalıştırılması içindir. İçeriğinde montajı tamamlanmış devrede çalıştırma öncesinde
K 5018 Hanımeli Elektrikli Pişirici Pizza Pan
 Model No: K 5018 Hanımeli Elektrikli Pişirici Pizza Pan Kullanma Kılavuzu / Instruction Manual K 5018 Hanımeli Elektrikli Pişirici Pizza Pan MAIN PARTS 1 3 4 2 6 5 7 9 8 1. Glass lid 2. Handles 3. Cooking
Veri kataloğu. Tekerlek cıvatalarının / tekerlek somunlarının takılması için talimatlar
 Veri kataloğu cıvatalarının / tekerlek somunlarının takılması için talimatlar Copyright Opel Automobile GmbH, Rüsselsheim am Main, Germany Bu broşürdeki bilgiler aşağıda belirtilen tarihten itibaren geçerlidir.
English Page 5 Turkish Page 13 STPP7502
 STPP7502 English Page 5 Turkish Page 13 ENGLISH (Original instructions) 1 2 5 4 3 6 2 (Original instructions) 8 7 ENGLISH 5 6 A 9 B 11 C 3 D 10 12 13 4 3 E 14 F 3 ENGLISH (Original instructions) 21 20
Register your product and get support at. HP8117. Kullanım kılavuzu
 Register your product and get support at www.philips.com/welcome HP8117 Kullanım kılavuzu a b Türkçe Bu ürünü satın aldığınız için tebrikler, Philips e hoş geldiniz! Philips tarafından verilen destekten
AÇELYA AZALEA. Motorlu Servis Reyonu / Plug-In Serve Over Counters
 AÇELYA AZALEA AÇELYA AZALEA Motorlu Servis Reyonu / Plug-In Serve Over Counters Açelya modeli sınırlı alanlarda et, süt, şarküteri ve çeşitli ambalajlanmış ürünlerinin en iyi şekilde sergilenebilmesi için
NONA AR IN 1 DİKEY ELEKTRİKLİ SÜPÜRGE AR IN 1 UPRIGHT VACUUM CLEANER KULLANMA KILAVUZU INSTRUCTION MANUAL 1200 W Ü Ç G E N B A Ş L I K
 NONA AR 4016 2 IN 1 DİKEY ELEKTRİKLİ SÜPÜRGE AR 4016 2 IN 1 UPRIGHT VACUUM CLEANER KULLANMA KILAVUZU INSTRUCTION MANUAL 1200 W Ü Ç G E N B A Ş L I K EN NONA AR 4016 2 in 1 UPRIGHT VACUUM CLEANER 1- Main
English Page 5 Turkish Page 14 STGL2218
 STGL2218 English Page 5 Turkish Page 14 ENGLISH (Original instructions) 2 1 4 A 3 3 6 5 20 7 B C1 2 (Original instructions) ENGLISH 10 8 10 8 6 7 6 9 7 10 8 6 7 C2 3 C3 10 11 90 o D 10 4 E 3 ENGLISH (Original
Mitsubishi Electric Corporation. Number of Items
 Mitsubishi K65HM-CE / KP65HM-CE High Density Thermal Paper Monochrome High Density Thermal Sensitive Paper A6 type media 110mm x 21m Bluish tone 4 rolls per box For use in CP-700DSU, CP-700U, CP-700UM,
BLOOM IP20 ALÇIPAN MONTAJ KILAVUZU
 BLOOM IP20 ALÇIPAN MONTAJ KILAVUZU BLOOM IP20 ALÇIPAN DRYWALL INSTALLATION GUIDE Voltaj / voltage: 220 240 VAC Frekans/Frequency 50-60 HZ Bu armatür ilgili standartlara uygun dizayn edilmiş ve üretilmiştirmontajı
BC-M150. Battery Charger. Genel Bakış
 BC-M150 Battery Charger Genel Bakış Versatile battery charger with the ability to charge conventional Li-ion, large capacity BPM100 and Ni-MH batteries (suitable for use with BP-M50, BP-M100 and BP-IL75).
Lenovo A369i. Quick Start Guide v1.0. English/Türkçe
 Lenovo A369i Quick Start Guide v1.0 English/Türkçe English Read this guide carefully before using your smartphone. Electronic emission notices European Union conformity Radio and Telecommunications Terminal
NILFISK BackVacuum KULLANMA TALİMATI
 NILFISK BackVacuum KULLANMA TALİMATI İÇİNDEKİLER İNGİLİZCE 8 VERİ 13 ÖNEMLİ EMNİYET KURALLARI Elektrikli bir cihazı kullanırken, aşağıdakiler dahil temel önlemleri daima alın : CİHAZI KULLANMADAN
Arýza Giderme. Troubleshooting
 Arýza Giderme Sorun Olasý Nedenler Giriþ Gerilimi düþük hata mesajý Þebeke giriþ gerilimi alt seviyenin altýnda geliyor Þebeke giriþ gerilimi tehlikeli derecede Yüksek geliyor Regülatör kontrol kartý hatasý
LIQUID RECEIVERS LİKİT TANKLARI VERTICAL LIQUID RECEIVERS DİKEY LİKİT TANKLARI HORIZONTAL & VERTICAL LIQUID RECEIVERS YATAY & DİKEY LİKİT TANKLARI
 LIQUID RECEIVERS LİKİT TANKLARI VERTICAL LIQUID RECEIVERS DİKEY LİKİT TANKLARI HORIZONTAL & VERTICAL LIQUID RECEIVERS YATAY & DİKEY LİKİT TANKLARI LIQUID RECEIVERS LİKİT TANKLARI info@guvensogutma.com
Register your product and get support at.
 Register your product and get support at www.philips.com/welcome ENGLISH Introduction Congratulations on your purchase and welcome to Philips! To fully benefit from the support that Philips offers, register
LIQUID RECEIVERS LİKİT TANKLARI VERTICAL LIQUID RECEIVERS DİKEY LİKİT TANKLARI HORIZONTAL & VERTICAL LIQUID RECEIVERS YATAY & DİKEY LİKİT TANKLARI
 LIQUID RECEIVERS LİKİT TANKLARI VERTICAL LIQUID RECEIVERS HORIZONTAL & VERTICAL LIQUID RECEIVERS YATAY & DİKEY LİKİT TANKLARI LIQUID RECEIVERS LİKİT TANKLARI info@guvensogutma.com LIQUID RECEIVERS LİKİT
Mobile Surveillance Vehicle
 Tecnical Specificca ons OIS is a mobile system which enables to observed related area. How it Works? Thanks to its highly productive solar panels, according to high ef ciency panelling can serve the purpose
Dijital Akü Ve Şarj Sistemi Test Cihazı
 Dijital Akü Ve Şarj Sistemi Test Cihazı DBP 03p 6-12-24V aküler içindir. Dahili yazıcısı ile sonuçlar kalıcıdır. 1 2 4 3 5 5 5 1 Yazıcı Kağıdı 4 LC Gösterge 2 Yazıcı çıkış 5 Kullanım Tuşu 3 Kağıt Sürücü