GB IRL AU %3$ AR 800AVENT FR (0) TR
|
|
|
- Hazan Fişek
- 8 yıl önce
- İzleme sayısı:
Transkript
1 GB AR FR TR
2 i j j a h l h b g b g c c k d d e e x y f f z m p u q v n r s w o t

3
4 D d e c 1 2 a j i 6 7 o

5 f b g n k E x z y 2 3

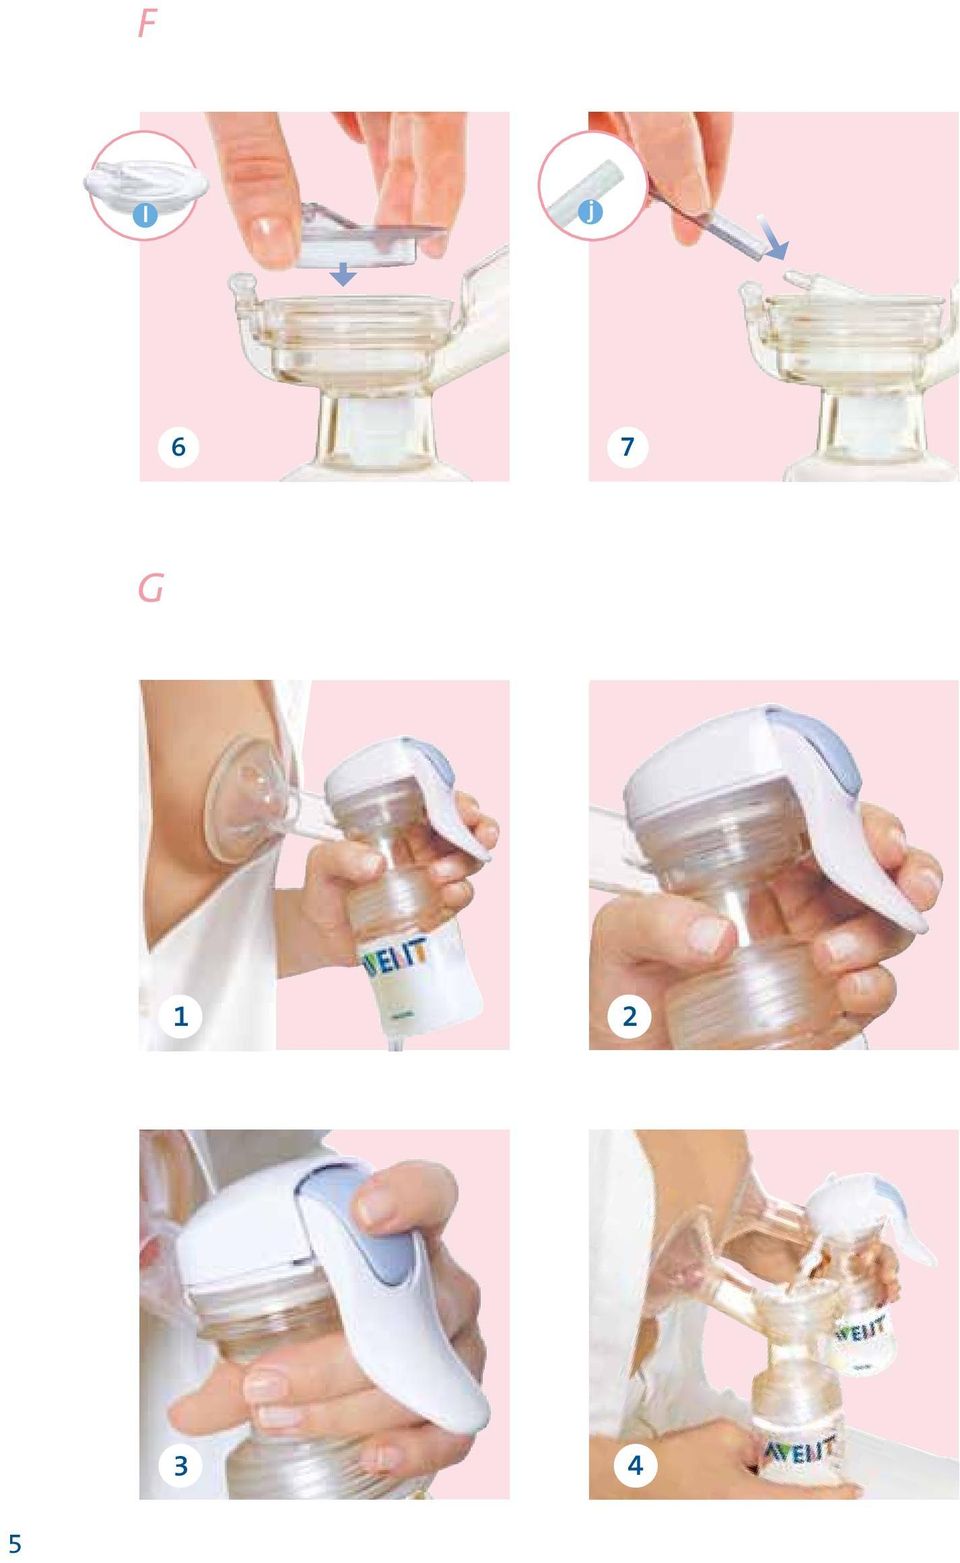
6 F l j 6 7 G
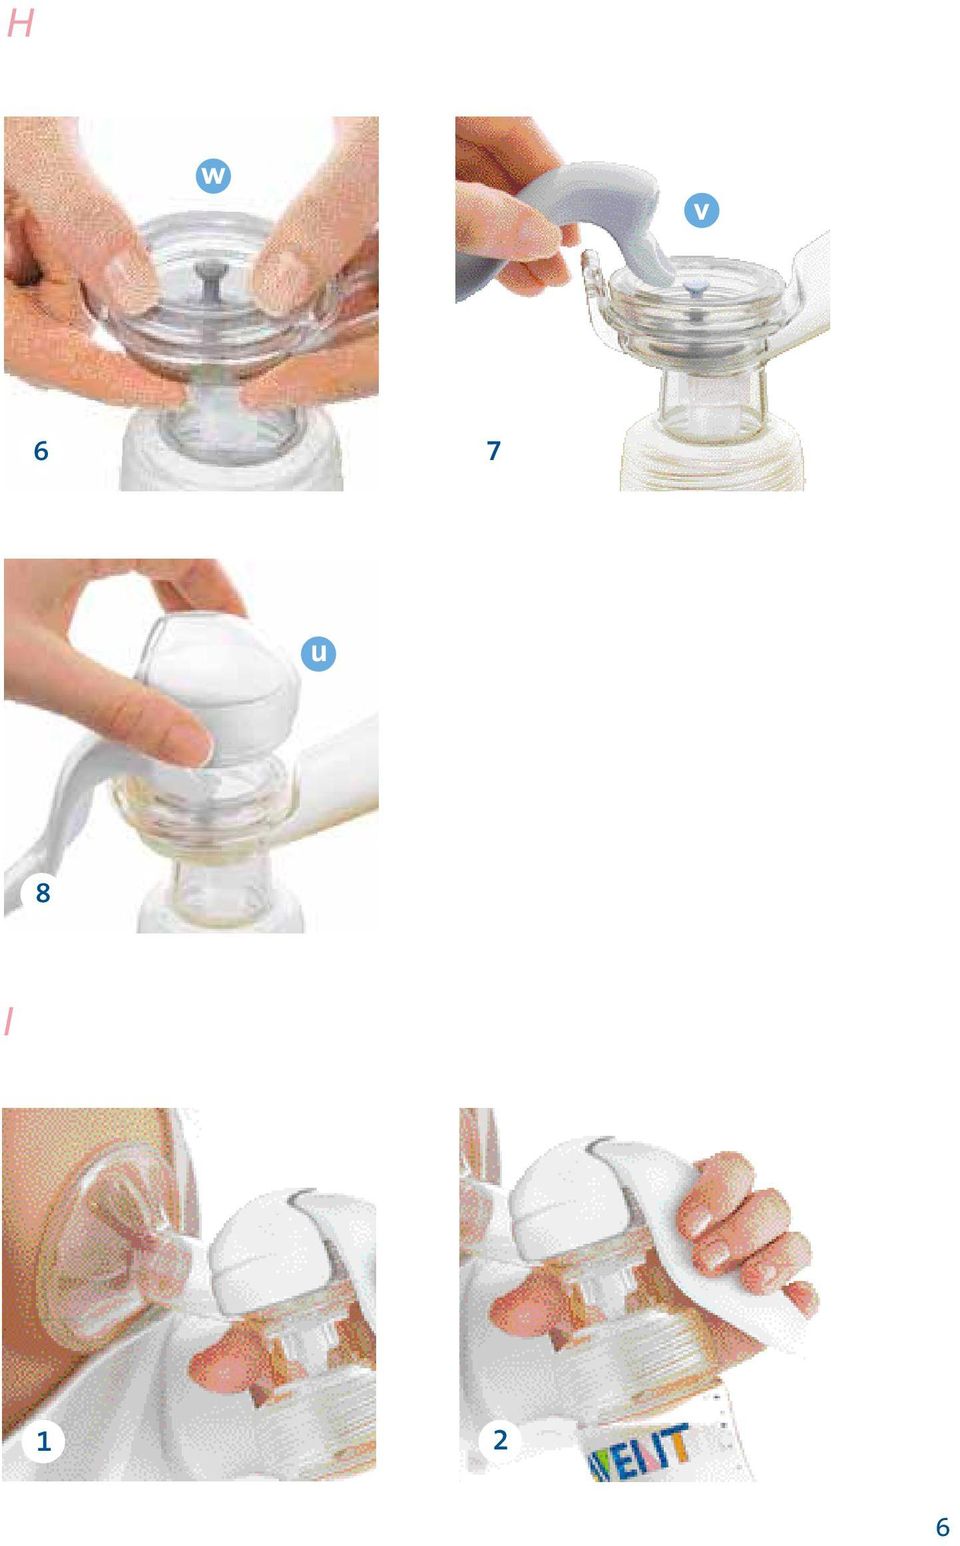
7 H w v 6 7 u 8 I 1 2 6
8 We ve taken everything women loved about our classic Manual Breast Pump the soft petal massager and fingertip sensitive control that make it feel so gentle, natural and comfortable and we ve given it an electronic memory. The Twin Electronic Breast Pump learns from you. Begin by pumping manually, then touch the button and let the Twin Electronic Breast Pump quietly continue your exact pumping rhythm. If at any time you want to vary the rhythm, touch the button again to revert to manual. The Twin Electronic Breast Pump is totally responsive to your needs. Relax and enjoy the experience because you re always in complete control. And when you re relaxed and comfortable, you express more milk, faster. Please take a few minutes to read through the ENTIRE INSTRUCTION LEAFLET before you use your Philips AVENT Twin Electronic Breast Pump for the first time. PLEASE SAVE THESE INSTRUCTIONS. Unless advised otherwise by your health professional it is best to wait until your breastfeeding routine is established before expressing usually around four weeks. 7

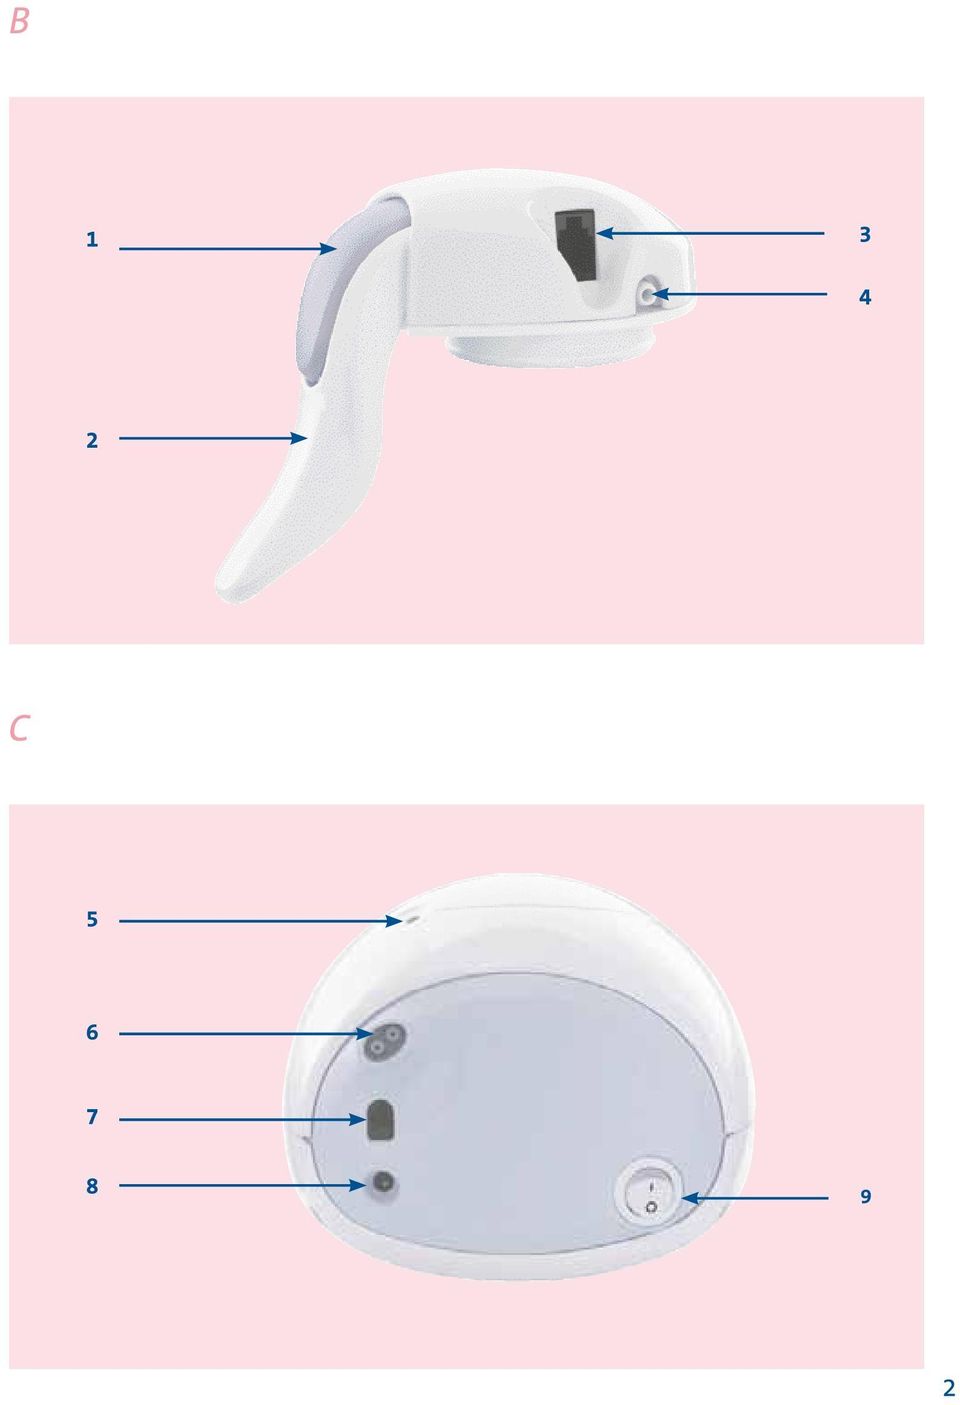
9 Breast Pump Parts Controller pump and second pump (diagram A1 and A2) a b c d e f g h i j k l m n o 1x Control handle 2x Silicone diaphragm 4x White valve 2x Pump body 4x Milk container (2x 125ml/4oz and 2x 260ml/9oz) 2x Stand (same as h ) 2x Let-down Massage Cushion 2x Funnel cover (same as f ) 1x Control cable 2x Transparent tube 1x Twin tubing 1x Double pumping connector 1x Pump motor 1x Electric adaptor 1x Wall plug lead Bottle parts (diagram A4) p q r s t 2x Dome cap 2x Extra Soft AVENT Teat, Newborn Flow (0M+) 2x Screw ring 2x Sealing base 2x Sealing disc Manual parts (diagram A5) u v w 1x Pump cover 1x Handle 1x Silicone diaphragm and stem VIA parts (diagram A3) x y z VIA Adaptor VIA Cup VIA Stand/Lid Control handle* (diagram B) 1. Control button 2. Control handle 3. Control cable socket 4. Tubing port Pump motor* (diagram C) 5. Light 6. Twin tubing port 7. Control cable socket 8. Power socket 9. On/off switch *NEVER STERILISE/IMMERSE IN WATER 8
 x y z VIA Adaptor VIA Cup VIA Stand/Lid Control handle* (diagram B) 1. Control button 2. Control handle 3.")
10 9 Important safeguards READ ALL INSTRUCTIONS BEFORE USING YOUR PHILIPS AVENT TWIN ELECTRONIC BREAST PUMP When using electrical products, especially when children are present, basic safety precautions should always be followed, including the following. WARNING To reduce the risk of fire, electrocution or other personal injury: Always unplug from the electrical wall socket immediately after use. Do not use while bathing. Do not place or store the product where it can fall or be pulled into a bath or sink. Do not place or drop the pump motor, control handle, electric adaptor or wall plug lead into water or other liquids. Do not reach for a product that has fallen into water. Unplug from the electrical wall socket immediately. Do not allow children or pets to play with the pump motor, tubing, power supply or accessories as these parts may pose a choking or strangulation danger. Before each use inspect the product, including mains power lead, for signs of damage. Never operate this product if it has a damaged lead or plug, if it is not working properly, if it has been dropped or damaged, or has been submerged in water. Only use attachments recommended by Philips AVENT. Do not use outdoors with the wall plug lead or where aerosol spray products are being used, or where oxygen is being administered. Equipment not suitable for use in the presence of flammable anaesthetic mixture with air, or with oxygen or nitrous oxide. Only use the electric adaptor supplied with the product. Ensure the unit is not exposed to extreme heat or placed in direct sunlight. There are no user serviceable parts inside the breast pump. Do not attempt to open, service or repair the breast pump yourself. Keep leads away from heated surfaces. The parts of the pump which come directly into contact with milk are personal care items and should not be shared between mothers. The only parts which can be shared are the pump motor, the control handle, the tubing and the double pumping connector. Do not attempt to remove the pump body from the breast while under vacuum. Turn the unit off and break the seal between your breast and the pump funnel with your finger, then remove the pump from your breast. Never use while pregnant as pumping can induce labour. Never use when sleepy or drowsy. This appliance is intended for use by responsible persons, keep out of reach of small children and the infirm. This appliance is not intended for use by persons including children with reduced physical, sensory or mental capabilities, or lack of experience or knowledge, unless they have been given supervision or instruction concerning use of the appliance by a person responsible for their safety. Children should be supervised to ensure that they do not play with the appliance. CAUTION To reduce the risks of injury, device malfunction or failure: The product should not be left unattended when plugged into an electrical wall socket. Never drop or insert any foreign object into any opening or tubing. Do not shorten the tubing. Make sure the voltage of the electrical adaptor is compatible with the power source. Plug the electric adaptor into the pump motor first, then securely attach the wall plug lead into the electric adaptor. Lastly, insert the plug into electrical wall socket. Although compliant with applicable EMC directives, this equipment may still be susceptible to excessive emissions and/or may interfere with more sensitive material. Wash, rinse and sterilise the appropriate pump parts before each use. Do not continue pumping for more than five minutes at a time if no result is achieved. Do not use antibacterial or abrasive cleaners/detergents when cleaning breast pump parts. Never put the control handle or breast pump motor in water or steriliser, as you can cause permanent damage to the pump. If the pressure generated is uncomfortable or causing pain, turn the unit off, break the seal between the breast and the pump body with your finger and remove the pump from your breast.

11 How to clean and sterilise your pump (see diagram A) NEVER WASH OR STERILISE the control handle (a), twin tubing (k), double pumping connector (l) or pump motor (m). a k l m These components DO NOT come into contact with your breast milk. You can wipe the pump motor and control handle clean, using a soft cloth. Cleaning and sterilising the pump bodies Before you use your breast pump for the first time and every time before use, you must disassemble, wash and sterilise all the breast pump parts that come into contact with your breast milk. You can use the dishwasher (top rack only) or hand wash in warm, soapy water and then rinse thoroughly. Sterilise these parts in a steam steriliser (digital, electric or microwave), or by boiling in water for 5 minutes. Do not use antibacterial or abrasive cleaners or detergents as they may cause the plastic to crack. To clean the valve, rub gently between your fingers in warm soapy water do not insert objects as this may cause damage. s Keeping your pump sterile and compact for travel g d After sterilising all parts, insert the white valve and diaphragm into the pump body (d) and clip the funnel cover (h) over the Let-down Massage Cushion (g). Now screw the sealing base (s) onto the pump body (d) in place of the milk container. h 10
 or hand wash in warm, soapy water and then rinse thoroughly.")
12 How to assemble your pump If you are single or double pumping to assemble the first pump (see diagram D): 1. With clean hands, insert the white valve (c) into the pump body (d) from the bottom making sure that the pointed side of the valve faces downwards. 2. Twist the milk container (e) onto the pump body until securely in place. 3. To ensure the pump doesn t topple, insert the 125ml/4oz milk container into the stand provided (f). 4. Place the silicone diaphragm (b) into the pump body (d), making sure it fits securely around the edge, to create a seal. (This is easier if the diaphragm is wet.) 5. Carefully insert the Let-down Massage Cushion (g) into the pump body (d), making sure it completely covers the edge of the funnel. (This is easier if the Let-down Massage Cushion is wet.) 6. Firmly push the control handle (a) onto the pump body (d) so that it sits securely on top of the silicone diaphragm (b). 7. If not already attached, push the transparent tube (j) securely onto the control handle (a) and click the control cable (i) into the adjacent socket. 8. Now attach the other end of the cable into the control cable socket on the rear of the pump motor (m) and securely connect the twin tubing (k) to the ports above. 9. You can keep the other transparent tube out of the way for now by attaching it to the white clip. 10. Connect the electric adaptor (n) to the pump motor (m). 11. Connect the wall plug lead (o) securely to the electric adaptor and then plug into an electrical wall socket. 12. Switch the pump motor on. 11
 into the pump body (d), making sure it fits securely around the edge, to create a seal. (This is easier if the diaphragm is wet.) 5.")
13 How to assemble your pump with VIA If you use the Twin Electronic Breast Pump with VIA, simply replace the bottle with the VIA Adaptor and Cup. Follow step 1 as before (see diagram D), then proceed to step 2 and 3 (see diagram E): 2. Twist the VIA Cup (y) into the Adaptor (x), then twist into the pump body (d). 3. To ensure the pump doesn t topple, insert VIA into the stand provided (z). Then continue with steps 4-12 (see diagram D) For double pumping to assemble the twin pump (see diagram F): Follow steps 1-5 as before (see diagram D), then proceed to step 6 and 7 (see diagram F): 6. Push the double pumping connector (l) onto the 2nd pump body (d) so that it sits firmly on top of the silicone diaphragm (b). 7. If not already attached, push the 2nd transparent tube (j) securely onto the double pumping connector (l). How to use your pump Wash your hands thoroughly and make sure your breasts are clean. Relax in a comfortable chair, leaning slightly forward (use cushions to support your back). Make sure you have a glass of water nearby as expressing can be thirsty work. A photograph of your baby will help too. To begin pumping (see diagram G) 1. Switch on your pump and the light on the top of the pump motor will flash ORANGE rapidly. The light will then change to a continuous GREEN to indicate that the pump is ready to use. If at any time this light is flashing RED, stop and consult the Troubleshooting guide on pages Press the assembled control pump firmly against your breast to create a seal. Using the control handle you can find your exact comfort level. As you press down on the handle you will feel greater suction against your breast. You don t need to squeeze the handle fully, only as far as feels comfortable for you. 12
 onto the 2nd pump body (d) so that it sits firmly on top of the silicone diaphragm (b). 7.")
14 2. Begin by gently squeezing the handle 5 or 6 times quite quickly, simulating the rapid suckling you usually feel when your baby is first put to the breast. Your milk will soon begin to flow and you can establish a slower, comfortable pumping pattern. Many mothers find that holding down the handle for 2 to 3 seconds at a time imitates the feeling of their baby breastfeeding. 3. When you have established a comfortable pumping rhythm with at least 2 squeezes, simply press the control button on the handle, and the Twin Electronic Breast Pump will automatically continue in the same way. The light on the pump motor will turn from solid GREEN to flashing GREEN. Your pattern will now be stored in the pump s memory even after the pump has been switched off! To double pump Check that the pump is assembled exactly as described on page 11. When you re ready to double pump the second pump will already have learned your pumping pattern, all you have to do is hold it against your other breast and create a seal, just as you did with the controller pump. Or if you prefer you can start with both pumps against your breasts. To change your pumping rhythm If at any time you want to change your pumping rhythm, press the control button again and the pump will revert to manual fingertip control. The light will turn back to solid GREEN. You can now pump manually until you are comfortable again. Then press the control button again and the Twin Electronic Breast Pump will continue your chosen rhythm. To stop pumping If at any time the suction becomes uncomfortable or if you want to stop pumping, press the control button and break the seal between the breast and the pump body with your finger. You can then turn the pump motor off. To collect and store your milk After you have expressed your milk, unscrew the pump body from the milk container. If you re using AVENT Breast Milk Containers, insert a sealing disc 13

15 into the screw ring (r) and twist it onto the milk container. If you re using VIA, unscrew the adaptor (x) and screw a lid (z) onto the cup (y). On average you will need to pump for 10 minutes to express ml/2-4ozs from each breast. However, this is just a guide and varies from woman to woman. If you find that you regularly express more than 125ml/4oz per session, please use a 260ml/9oz AVENT Breast Milk Container. Breast milk can be stored in the fridge or freezer in either sterile breast milk containers (125ml/4oz, 260ml/9oz or 330ml fitted with sealing discs) or in pre-sterilised VIA Cups. Do not overfill the milk container and be sure to keep it upright, otherwise it may leak. To feed, just replace the sealing disc with an AVENT Teat. Alternatively replace the VIA Lid with a sterilised VIA Adaptor, screw ring, dome cap and AVENT Teat. Expressed milk should be refrigerated immediately. Only milk collected with a sterile pump should be stored to be fed to your baby. Expressed breast milk can be stored in the refrigerator for up to 48 hours (not in the door) or in the freezer for up to 3 months. If you are storing freshly expressed milk in the fridge to add to during the day, only add milk which has been expressed into a sterile container. Milk can only be kept like this for a maximum of 48 hours from first expression, after which it must be used immediately or frozen for future use. Frozen breast milk can be defrosted overnight in the refrigerator, heated gradually in warm water or heated in a Philips AVENT Bottle and Baby Food Warmer. Note: NEVER refreeze breast milk. DO NOT add fresh breast milk to already frozen milk. ALWAYS discard any milk that is left over at the end of a feed. Never heat milk in a microwave as this may destroy valuable nutrients and antibodies. In addition, the uneven heating may cause hot spots in the liquid which could cause burns to the throat. Never immerse a frozen milk container or VIA Cup in boiling water as this may cause it to crack/split. Never put boiling water directly into a VIA Cup, allow to cool for around 20 minutes before filling. 14
 or in pre-sterilised VIA Cups.")
16 Hints to help you succeed Using a breast pump takes practice. You may need to make several attempts before you succeed, but because the Twin Electronic Breast Pump is so simple and comfortable to use, you will soon get used to expressing milk. 1. Choose a quiet time when you re not rushed and unlikely to be disturbed. 2. Having your baby or a photograph of your baby nearby can help encourage your milk to flow. 3. Warmth and relaxation can help, so you might like to try expressing after a warm bath or shower. 4. Placing a warm cloth on your breasts for a few minutes before you start pumping can also encourage your milk flow and soothe painful breasts. 5. Try expressing from one breast while your baby is feeding on the other, or continue expressing just after a feed. 6. Repositioning the pump on your breasts from time to time can help stimulate your milk ducts. 7. Some women may prefer to use the pump without the Let-down Massage Cushion. However, it has been shown that, in most cases, the massaging effect of the petals flexing in and out around the areola stimulates the let-down reflex and allows you to express more milk, faster. 8. To relieve engorgement, we recommend gentle and slow single pumping to relieve the pressure. Practice with your pump to find the best pumping techniques for you. Don t worry if your milk doesn t flow immediately, relax and continue pumping. Do not continue pumping for more than 5 minutes at a time if NO result is achieved. Try expressing at another time during the day. 15

17 Using your Electronic Pump as a Manual Breast Pump (see diagram H) Your Twin Electronic Breast Pump can also be used as a single manual pump. In this case, you simply need to replace the control handle or double pumping connector and silicone diaphragm with the 3 manual pump parts provided (u, v and w). Assembling your Manual Breast Pump Ensure you have disassembled, washed and sterilised all the parts. As before in diagram D 1, 2, 3, 5, but this time: 6. Place the silicone diaphragm with the stem (w) into the pump body (d), making sure it fits securely around the edge, to create a seal. (This is easier if the diaphragm is wet.) 7. Position the forked end of the handle (v) under the diaphragm stem (w) and push down gently on the handle until you hear it click into place. 8. Click the pump cover (u) onto the pump body (d). How to use your Manual Breast Pump (see diagram I) 1. Press the Let-down Massage Cushion firmly against your breast to create a perfect seal. 2. Gently squeeze the handle 5 or 6 times fairly quickly to initiate let-down. 3. When you see your milk beginning to flow, establish a rhythm of pumping to meet your own comfort level. 16
 into the pump body (d), making sure it fits securely around the edge, to create a seal. (This is easier if the diaphragm is wet.) 7.")
18 Key to product base label Symbols as featured on the rating label on the pump motor and electric adaptor. Guarantee Philips AVENT guarantees that should the Twin Electronic Breast Pump become faulty during 24 months from the date of purchase, it will be replaced free of charge during this time. Please return it to the retailer where it was purchased. Please keep your receipt as a proof of purchase or your guarantee page with the date of purchase and the stamp of the retailer. For the Guarantee to be valid, please note: The Twin Electronic Breast Pump must be used according to the instructions in this booklet and connected to a suitable electricity supply. The claim must not be a result of accident, misuse, dirt, neglect or fair wear and tear. This Guarantee does not affect your statutory rights. If the retailer is unable to help, please contact Philips AVENT Customer Services (see back cover for details). 17

19 Troubleshooting guide CONCERN SOLUTION Lack of suction Check that all pump parts have been assembled correctly and that the valve is positioned correctly. Ensure that the silicone diaphragm and Let-down Massage Cushion are fitted securely to the pump body and a perfect seal is created. Make certain that the tubing connections and control handle are firmly in place. No milk being expressed Ensure the pump is correctly assembled and that suction is being created. Relax and try again, as expression may improve after practice. Refer to the Hints to help you succeed section. Pain in the breast area when expressing You may be squeezing too hard. You do not need to use all the suction the pump can generate. Try squeezing the handle more gently and remember the 2-3 second pumping rhythm. Consult your health professional/breastfeeding advisor. Milk is drawn up the Let-down Massage Cushion Remove and re-fit the Let-down Massage Cushion to ensure it is firmly attached and pushed far enough down the centre of the funnel. Try leaning slightly forward. 18

20 CONCERN SOLUTION Cracking or discolouration of pump parts Lost or broken parts Avoid contact with antibacterial or abrasive detergents/cleaners as they can damage the plastic. Combinations of detergents, cleaning products, sterilising solution, softened water and temperature fluctuations may, under certain circumstances, cause the plastic to crack. If this occurs, do not use. The pump bodies and breast milk containers are dishwasher safe but food colourings may discolour them. Follow guidelines in How to clean and sterilise your Twin Electronic Breast Pump of the instruction booklet. Contact Philips AVENT Customer Services for replacements (see back cover for contact details). Pump not responding Ensure the pump is correctly assembled and switched on with the power indicator illuminated GREEN. Make sure the cables between the electrical wall socket and the pump are correctly connected. Pump light flashing RED If the pump stops working and the power light is flashing RED then a fault has been detected. 3 flashes, delay, 3 flashes, etc the pump has detected a vacuum fault. Switch off the pump motor and check tubing and connections for obstructions or damage. 2 flashes, delay, 2 flashes, etc the pump has detected that it has overheated. Switch off the pump motor. Ensure unit is not exposed to heat sources or sitting in direct sunlight. Allow unit to stabilise before trying again. Continuous flashing the pump has detected that the control cable has been incorrectly fitted/ not fitted or the cable is damaged. 19

21 20
22 21
23 22
24 23
25 24
26 25
27 26
28 27
29 28
30 a k l m s d g h 29
31 30
32 a b c d e f g h i j k l m n o 31
33 32
34 Pour réaliser ce tire-lait électronique, nous avons repris tous les avantages offerts par notre célèbre tire-lait manuel (efficacité du doux coussin masseur et réglages illimités permis par la poignée) et y avons ajouté une mémoire électronique. Le tire-lait électronique double suit et mémorise fidèlement vos instructions. Commencez par tirer votre lait manuellement, appuyez sur le bouton et laissez l appareil reproduire tranquillement votre rythme de succion. Dès que vous désirez interrompre ou modifier l aspiration, pressez la touche bleue pour revenir à une commande manuelle. Le tire-lait électronique double réagit immédiatement à vos instructions. Détendez-vous et profitez d une expérience que vous contrôlez totalement. Dans la détente et le bien-être, vous tirez plus de lait et plus rapidement. Veuillez consacrer quelques minutes à la LECTURE INTÉGRALE DU MODE D EMPLOI avant votre première utilisation du tire-lait électronique double Philips AVENT. CONSERVEZ SOIGNEUSEMENT CE FASCICULE. Si vous désirez tirer votre lait pour le stocker, sauf avis médical contraire, il est préférable d attendre que votre routine d allaitement soit bien établie (ce qui prend généralement de quatre à cinq semaines) avant de tirer votre lait. 33
35 Pièces du tire-lait Tire-lait commande et second tire-lait (photos A1 et A2) 1 Poignée de commande 2 Diaphragmes en silicone 4 Valves blanches 2 Entonnoirs 4 Biberons de conservation (2x125 ml et 2x260 ml) 2 Bases (comme ) 2 Coussins Masseurs à alvéoles 2 Couvercles d entonnoir (comme ) 1 Câble de commande 2 Tubes transparents 1 Tuyau double 1 Connecteur double pompage 1 Moteur 1 Adaptateur électrique 1 Fiche secteur Pièces du biberon (photos A4) 2 Capuchons 2 Tétines extra-souples AVENT, débit nouveau-né (1 trou) 2 Bagues 2 Bases d étanchéité 2 Disques d étanchéité Pièces de tire-lait manuel (photos A5) 1 Couvercle d entonnoir 1 Poignée 1 Diaphragme en silicone et tige Pièces du système VIA (photos A3) Adaptateurs VIA Pots VIA Couvercles/socles VIA Poignée de commande* (photos B) 1. Touche commande 2. Poignée de commande 3. Prise câble de commande 4. Prise de tuyau *NE JAMAIS STÉRILISER/IMMERGER! Moteur* (photos C) 5. Voyant lumineux 6. Prise tuyau double 7. Prise câble de commande 8. Prise fiche secteur 9. Interrupteur 34
36 Importantes mesures de sécurité 35 VEUILLEZ LIRE TOUTES LES INSTRUCTIONS AVANT D UTILISER VOTRE TIRE-LAIT ÉLECTRONIQUE DOUBLE PHILIPS AVENT. Certaines précautions, y compris les suivantes, s imposent durant l utilisation d appareils électriques, surtout en présence d enfants. ATTENTION Pour réduire les risques d incendie, d électrocution ou d autres accidents : Débranchez toujours l appareil après utilisation. Ne l utilisez pas dans le bain. Ne le placez pas et ne le rangez pas là où il risque de tomber ou de glisser dans une baignoire ou un évier. Ne placez pas et ne laissez pas tomber le moteur du tire-lait, la poignée de commande ou la fiche électrique dans de l eau ou autre liquide. Ne touchez pas un appareil électrique tombé dans l eau. Débranchez-le d abord immédiatement. Ne laissez pas d enfants ou d animaux jouer avec le moteur du tire-lait, les tuyaux, les prises de courant ou leurs accessoires car ces pièces présentent un danger d étouffement ou d étranglement. Avant chaque utilisation, vérifiez le bon état du produit, y compris la fiche secteur. Ne mettez jamais le produit en marche si la fiche ou la prise sont endommagées, s il ne fonctionne pas correctement, s il est tombé ou abîmé ou s il a été plongé dans l eau. N utilisez avec ce tire-lait que les accessoires recommandés par Philips AVENT. Ne l utilisez pas dehors si des aérosols sont diffusés ni dans un endroit où on administre de l oxygène. Ne l utilisez pas en présence de mélange d anesthésiant inflammable à l air, ni avec de l oxygène ou de l oxyde azoteux. N utilisez comme adaptateur électrique que celui fourni avec l appareil. Assurez-vous que l appareil n est pas exposé à une chaleur intense ni placé en plein soleil. Il n y a pas de pièces réparables à l intérieur du tire-lait. Ne tentez pas d ouvrir, d entretenir ou de réparer vous-même le tire-lait. Gardez les prises et tubes éloignés de surfaces chaudes. Les pièces du tire-lait qui rentrent en contact avec le lait sont des objets personnels et ne devraient pas se partager entre mamans. Les seules pièces qui peuvent se partager sont le moteur, la poignée de commande, les tuyaux et les fils de connexion. N essayez pas de retirer l entonnoir de votre sein quand le tire-lait est en marche. Éteignez l appareil et dégagez la succion en glissant votre doigt dans l entonnoir, puis ôter le tire-lait de votre sein. N utilisez jamais pendant la grossesse car tirer du lait peut déclencher l accouchement. Ne vous en servez pas si vous avez sommeil ou que vous êtes mal réveillée. Cet appareil est destiné à l usage de personnes responsables. Gardez hors de la portée de petits enfants ou d infirmes. L utilisation de cet appareil est déconseillée aux personnes, enfants inclus, dont les capacités physiques, sensorielles ou mentales sont limitées, ou qui manquent d expérience ou de connaissances, sauf si ces mêmes personnes ont reçu, de la part d une personne responsable de leur sécurité, les instructions nécessaires à l utilisation appropriée de l appareil. Il est impératif de veiller à ce que les enfants ne jouent pas avec l appareil. AVERTISSEMENT Pour réduire tout risque d accidents, de mauvais fonctionnement ou de panne : L appareil ne devrait pas être laissé sans surveillance quand il est branché. Ne laissez pas tomber et n insérez pas d objet dans les prises ou dans les tuyaux. Ne raccourcissez pas les tuyaux. Assurez-vous que le voltage de l adaptateur électrique est compatible avec celui de votre secteur. Branchez l adaptateur électrique dans le moteur de la pompe d abord, puis enfoncez bien la fiche électrique dans l adaptateur. Enfin, branchez sur secteur. Bien que conforme aux directives EMC applicables, cet appareil peut être affecté par des émissions excessives et/ou peut causer des interférences avec du matériel plus sensible. Lavez, rincez et stérilisez les pièces de tire-lait appropriées avant chaque utilisation. Ne continuez pas à tirer plus de cinq minutes à la fois si vous n obtenez pas de résultat. N utilisez pas de produits nettoyants antibactériens ou abrasifs pour laver les pièces du tire-lait. Ne mettez jamais la poignée de commande ni le moteur du tire-lait dans l eau ou dans un stérilisateur sous risque de dégâts permanents. Si la pression générée est inconfortable ou douloureuse, éteignez l appareil, dégagez la succion en glissant votre doigt dans l entonnoir, puis ôter le tire-lait de votre sein.
37 Comment nettoyer et stériliser votre tire-lait (voir photos A) NE JAMAIS LAVER OU STÉRILISER la poignée de commande (a), le tuyau double (k), le connecteur double pompage (l) ou le moteur du tire-lait (m) a k Ces pièces NE rentrent PAS en contact avec votre lait. Vous pouvez passer un chiffon doux sur le moteur du tire-lait et la poignée commande si nécessaire. l m Pour nettoyer et stériliser les entonnoirs de tire-lait Avant votre première utilisation du tire-lait et à chaque fois, il faut démonter, laver et stériliser toutes les pièces qui rentrent en contact avec votre lait. Vous pouvez les mettre au lave-vaisselle (panier du haut) ou les laver à l eau chaude savonneuse et bien les rincer. Stérilisez ces pièces au stérilisateur à vapeur (électrique, électronique ou pour four micro-ondes) ou par ébullition pendant 5 minutes. N utilisez pas de nettoyants ou de détergents anti-bactériens qui pourraient occasionner des fissures dans le plastique. Pour nettoyer la valve, frottez doucement avec les doigts dans de l eau chaude savonneuse. N y insérez pas d objet qui pourrait l endommager. s Pour transporter facilement votre tire-lait stérilisé Après avoir stérilisé toutes ces pièces, insérez la valve blanche et le diaphragme dans le tire-lait (d) et pressez fermement le couvercle (h) sur l entonnoir muni du Coussin Masseur (g). Vissez le gardetétine (s) sur le col de l entonnoir du tire-lait (d) à la place du biberon. g d h 36
38 Comment assembler votre tire-lait Si vous tirez d un sein ou des deux pour assembler le premier tire-lait (voir photos D) : 1. Les mains bien propres, insérez la valve blanche (c) dans l entonnoir (d) par le fond, en vous assurant que le côté pointu est orienté vers le bas. 2. Vissez soigneusement le biberon (e) au col de l entonnoir. 3. Pour plus de stabilité, insérez le biberon de conservation 125 ml dans le socle fourni (f). 4. Placez le diaphragme en silicone (b) dans l entonnoir du tire-lait (d) et repliez uniformément les bords tout autour pour assurer l étanchéité (ce qui est plus facile quand le diaphragme est mouillé). 5. Insérez minutieusement le coussin masseur (g) dans l entonnoir du tirelait en repliant uniformément les bords tout autour. (Ce qui est plus facile quand le coussin est mouillé.) 6. Poussez fermement la base de la poignée de commande (a) dans l entonnoir du tire-lait (d) pour qu elle s y insère par-dessus le diaphragme en silicone (b), le manche enclenché dans la charnière. 7. S il n est pas déjà attaché, poussez le tube transparent (j) dans sa prise sur la poignée de commande et insérez le câble de commande (i) dans sa prise adjacente. 8. Enfoncez alors l autre bout du câble dans sa prise, celle du milieu derrière le moteur du tire-lait puis poussez le bout blanc du tuyau double transparent dans sa prise, juste au-dessus. 9. Si vous n allez tirer que d un sein, vous pouvez isoler le deuxième tube transparent en le repliant sur l attache. 10. Branchez l adaptateur électrique (n) sur le moteur du tire-lait. 11. Connectez le fil électrique (o) à l adaptateur et branchez sur secteur. 12. Appuyez sur l interrupteur. 37
39 Comment assembler votre tire-lait sur le système VIA Si vous utilisez le tire-lait électronique double avec le système VIA, remplacez simplement le biberon par l adaptateur et le pot VIA. Suivez les instructions 1 des photos D et 2, 3 des photos E : 2. Vissez le pot VIA (y) dans l adaptateur VIA (x), puis vissez dans le col de l entonnoir (d). 3. Pour plus de stabilité, insérez le pot VIA dans le couvercle VIA fourni (z). Puis continuez avec les instructions 4-12 (voir photos D). Pour tirer des deux seins à la fois pour assembler le double tire-lait (voir photos F) : Suivez les instructions 1-5 des photos D puis regardez les photos F, instructions 6 et 7 (voir photos F) : 6. Rentrez fermement le connecteur double pompage sur l entonnoir du tire-lait (d) pour qu il s insère par-dessus le diaphragme en silicone (b). 7. S il n est pas déjà attaché, poussez le second tube transparent (j) dans le connecteur double pompage (l). Comment utiliser votre tire-lait Lavez-vous soigneusement les mains et assurez-vous que vos seins sont propres. Détendez-vous dans un siège confortable, légèrement penchée en avant, avec quelques coussins dans le dos. Gardez une boisson à portée de main, tirer son lait peut donner soif. Vous trouverez peut-être utile de regarder une photo de votre bébé. Pour commencer (photos G) 1. Appuyez sur l interrupteur de votre tire-lait et le voyant lumineux situé sur le moteur clignotera ORANGE. Puis il restera VERT, indiquant que le tire-lait est prêt à l emploi. Si jamais le voyant clignote ROUGE, arrêtez et consultez le guide En cas de problème pages Positionnez le tire-lait à commande tout assemblé sur votre sein pour obtenir l étanchéité. Pressez la poignée du bout des doigts pour déterminer votre niveau de confort. 38
40 2. Commencez par presser la poignée 5 ou 6 fois rapidement selon votre niveau de confort, pour imiter la succion que vous ressentez habituellement quand votre bébé se met à téter. La succion s amplifie avec la pression mais vous n avez pas besoin de presser jusqu au bout, uniquement jusqu au point qui vous convient. Votre lait va bientôt commencer à couler, adoptez alors le rythme d extraction que vous désirez. Beaucoup de mamans trouvent qu une pression de 2 à 3 secondes à la fois reproduit bien la sensation de leur bébé au sein. 3. Après avoir pressé au moins deux fois pour établir un rythme de succion confortable, il suffit d appuyer sur la touche de commande de la poignée pour que le tire-lait électronique double continue automatiquement. Le voyant du moteur passera de VERT constant à VERT clignotant. Ce rythme-là sera gravé dans la mémoire du tire-lait même quand il est éteint jusqu à ce que vous décidiez de le changer. Pour tirer des deux seins à la fois Vérifiez que le tire-lait est correctement assemblé, comme indiqué page 11. Quand vous serez prête à tirer des deux seins à la fois, le second tire-lait aura déjà appris votre rythme d extraction et vous n aurez plus qu à l appliquer hermétiquement contre votre autre sein, comme le tire-lait à commande. Ou, si vous préférez, vous pouvez déjà commencer avec les deux tire-laits en même temps. Pour modifier votre rythme d extraction Dès que vous désirez changer de rythme, pressez la touche bleue et le tire-lait reviendra à une commande manuelle. Le voyant redeviendra VERT constant. Quand vous presserez à nouveau la touche de commande, le tire-lait électronique double continuera au rythme choisi. Pour arrêter de tirer son lait Quand vous souhaitez arrêter tout à fait de tirer, pressez la touche et dégagez le sein du tire-lait avec votre doigt. Vous pouvez alors éteindre le moteur. Conservation du lait maternel Une fois votre lait tiré, dévissez l entonnoir du biberon. Si vous utilisez un biberon de conservation AVENT, insérez un disque d étanchéité dans la bague (r) et revissez-la au biberon de conservation. Si vous utilisez un pot VIA, dévissez l adaptateur (x) et revissez un couvercle (z) sur le pot (y). 39
41 En moyenne, il faut à peu près 10 minutes pour tirer de 60 à 125ml de chaque sein. Cependant, ceci n est donné qu à titre indicatif et varie selon les mamans. Si vous constatez que vous tirez régulièrement plus de 125ml par séance, veuillez utiliser un biberon AVENT 260 ml. Le lait maternel se conserve au réfrigérateur (pas dans la porte) ou au congélateur, soit dans des biberons de conservation stérilisés (125 ml, 260 ml ou 330ml munis de disques d étanchéité), soit dans des pots VIA pré-stérilisés. Ne remplissez pas les récipients à ras bord et tenez-les droits pour éviter tout risque de fuites. Pour donner la tétée, il suffit de remplacer les disques d étanchéité par des tétines AVENT. Alternativement, vissez bague et tétine AVENT à l adaptateur VIA, les 3 pièces étant stérilisées, et attachez au pot VIA. Le lait maternel exprimé doit être réfrigéré tout de suite. Ne conservez pour donner à votre bébé que du lait tiré avec un tire-lait stérilisé. Le lait tiré se conserve 48 heures au réfrigérateur (pas dans la porte) ou jusqu à 3 mois au congélateur. Si vous avez déjà mis du lait tiré au réfrigérateur et que vous souhaitez en rajouter le même jour dans le même biberon, n utilisez que du lait conservé dans un biberon stérilisé et assurez-vous que vous replacez le biberon au réfrigérateur à chaque fois. Un biberon ainsi constitué ne se conserve pas plus de 48 heures maximum (à partir de la première extraction) après quoi il doit être consommé immédiatement ou congelé. Le lait maternel congelé peut être décongelé la nuit au réfrigérateur et réchauffé graduellement dans l eau chaude ou dans un chauffe-biberon/chauffe-repas Philips AVENT. Attention : NE recongelez JAMAIS du lait maternel. Ne rajoutez pas de lait maternel frais à du lait maternel déjà congelé. Jetez toujours le lait qui reste à la fin d une tétée. Ne réchauffez jamais de lait aux micro-ondes, ce qui pourrait détruire des éléments nutritifs et certains anticorps. De plus, la chaleur inégalement répartie peut causer des brûlures à la gorge. Ne plongez jamais un récipient ou un pot VIA de lait congelé dans de l eau bouillante, car ceci pourrait les fissurer. Ne versez jamais d eau bouillante dans un pot VIA, laissez-la refroidir pendant environ 20 minutes avant. 40
42 Conseils d utilisation pour vous aider à tirer votre lait Utiliser un tire-lait est une habitude qui s acquière. Il vous faudra peut-être essayer à plusieurs reprises. Toutefois, le tire-lait électronique double est si simple et si confortable à utiliser que vous parviendrez très vite à extraire votre lait sans difficulté. 1. Choisissez un moment où vous êtes tranquille et où vous ne risquez pas d être dérangée. 2. Regarder bébé ou sa photo peut encourager la montée de lait. 3. La détente et la chaleur y étant propices, essayez de tirer du lait après un bain ou une douche chaude. 4. Un gant de toilette chaud et humide quelques minutes sur les seins avant de commencer à tirer favorise la montée de lait et soulage les seins douloureux. 5. Essayez de tirer d un sein pendant que votre bébé tète de l autre ou juste après une tétée. 6. Changez la position du tire-lait de temps en temps pour stimuler les galactophores. 7. Certaines mamans préfèrent peut-être se passer du coussin en silicone. Cependant, les essais effectués ont prouvé que, la plupart du temps, l effet de massage sur l aréole, dû à la flexion des alvéoles, stimule la montée de lait et permet d exprimer plus de lait, plus rapidement. 8. Pour calmer un engorgement, nous conseillons de tirer doucement et lentement d un sein à la fois pour soulager la tension. Entraînez-vous pour trouver la technique et la position qui vous conviennent le mieux. Ne vous inquiétez pas si votre lait ne coule pas tout de suite. Détendez-vous et continuez. Au début, ne passez que quelques minutes à la fois sur chaque sein. Ne continuez pas à tirer plus de 5 minutes à la fois si vous n obtenez AUCUN résultat. Essayez de tirer à d autres moments de la journée. 41
43 Pour utiliser votre tire-lait électronique comme un tire-lait manuel (photos H) Votre tire-lait électronique double peut également s utiliser comme un tire-lait manuel individuel. Si vous en avez besoin, il suffit de remplacer la poignée de commande ou le connecteur double pompage et le diaphragme en silicone par les 3 pièces fournies (u, v, w). Pour assembler votre tire-lait manuel Assurez-vous que vous avez désassemblé, lavé et stérilisé toutes les pièces. Procédez selon les étapes 1, 2, 3, 5 des photos D, mais cette fois : 6. Placez le diaphragme à tige en silicone (w) sur l entonnoir (d) en repliant les bords par-dessus toute la circonférence. Pressez des doigts tout autour pour assurer que l étanchéité est parfaite (la tâche est facilitée quand les pièces sont encore mouillées). 7. Positionnez la fourche de la poignée (v) sous le haut de la tige du diaphragme (w) et abaissez doucement sur la charnière où elle s installe avec un déclic. 8. Posez fermement le couvercle (u) sur l entonnoir (d). Comment utiliser votre tire-lait manuel (photos I) 1. Positionnez le coussin masseur sur votre sein pour assurer l étanchéité. 2. Appuyez doucement sur la poignée 5 ou 6 fois plutôt vite pour enclencher le réflexe d éjection du lait. 3. Quand vous voyez que votre lait se met à couler, adoptez le rythme d extraction qui vous convient. 42
44 Signification des étiquettes apposées Symboles utilisés sur les étiquettes collées sur le moteur et l adaptateur électrique. Garantie Philips AVENT garantit qu en cas de défaillance du tire-lait électronique double dans une période de 24 mois suivant la date de son achat, l appareil sera remplacé gratuitement durant cette période. Veuillez le rendre au détaillant qui vous l a vendu. Veuillez garder votre reçu comme preuve d achat ou bien la page de cette garantie dûment tamponnée et datée par le détaillant. Pour que cette garantie soit valide, veuillez noter que : Le tire-lait électronique double doit être utilisé conformément aux instructions fournies dans ce dépliant, et doit être branché à une source d alimentation électrique adéquate. La plainte ne doit pas découler d un accident, d un abus, d un manque de propreté, d une négligence ou d usure normale. Cette garantie n affecte pas vos droits légaux. Si le détaillant ne peut pas vous aider, veuillez contacter le service après-ventes Philips AVENT (voir au dos de ce fascicule). 43
45 En cas de problème PROBLÈME Manque de succion Le lait ne coule pas SOLUTION Vérifiez que toutes les pièces sont assemblées correctement et que la valve est positionnée dans le bon sens. Assurez-vo us que le diaphragme en silicone et le coussin masseur épousent bien l entonnoir et procurent une étanchéité parfaite. Regardez si les tuyaux sont bien connectés et si la poignée de commande est bien enfoncée par-dessus le diaphragme. Assurez-vous que le tire-lait est assemblé correctement et que l aspiration s effectue. Détendez-vous et recommencez parce qu il faut un peu de pratique. Consultez la section conseils d utilisation. Douleur au sein pendant l extraction Le lait s infiltre sous le coussin masseur Vous appuyez peut-être trop fort. Vous n avez pas besoin de presser la poignée à fond mais juste assez pour votre propre débit. Essayez d appuyer moins fort et souvenez-vous du rythme à 2-3 secondes. Parlez-en à votre sage-femme ou à une consultante en lactation. Enlevez le coussin et remettez-le en place en vous assurant qu il est bien collé à l entonnoir, replié sur les bords et repoussé au fond. Essayez de vous pencher légèrement en avant. 44
46 CONCERN Fissure ou décoloration des pièces du tire-lait Pièces perdues ou cassées Pump not responding SOLUTION Évitez tout contact avec des produits nettoyants antibactériens ou abrasifs qui peuvent abîmer le plastique. Un mélange de détergents, de produits de nettoyage, de solution stérilisante, d eau adoucie et de fluctuations de température peut, dans certaines circonstances, fendre le plastique. Si cela vous arrive, n utilisez plus les pièces abîmées et remplacez-les. Les entonnoirs et biberons vont au lave-vaisselle mais certains colorants alimentaires déteignent parfois dessus. Suivez les instructions Comment nettoyer et stériliser votre tire-lait électronique double de ce mode d emploi. Contactez le service après-vente Philips AVENT (voir au dos du fascicule) pour obtenir des pièces de rechange. Assurez-vous qu il est correctement assemblé, qu il est branché et que le voyant lumineux est VERT. Vérifiez les connexions de fiches entre la prise secteur et le tire-lait. Clignotement ROUGE du voyant lumineux Si le tire-lait s arrête et que le voyant lumineux clignote ROUGE, l appareil a détecté une faute. 3 clignotements, temps d arrêt, 3 clignotements etc. l appareil a détecté que l aspiration est fautive. Éteignez le moteur et vérifiez si tuyaux et connexions sont obstrués ou abîmés. 2 clignotements, temps d arrêt, 2 clignotements, etc. l appareil a détecté une surchauffe. Éteignez le moteur. Assurez-vous que l appareil n est pas en plein soleil ni près d une source de chaleur. Attendez qu il se stabilise avant de le remettre en marche. Clignotement continu l appareil a détecté que le câble de commande est mal ou n est pas connecté ou qu il est endommagé. 45
47 Doğal ve rahat hissettiren, 5 yapraklı yumuşak masaj yastığı, parmak ucuyla bile kontrol edilebilme özelliği gibi, Manuel Göğüs Pompasında sevilen ne varsa hepsini aldık ve bunlara elektronik hafıza ekledik. İkili Elektronik Göğüs Pompası sizden öğrenir. Manuel olarak pompalamaya başlayın, ardından düğmeye dokunun ve İkili Elektronik Göğüs Pompasının tam olarak sizin pompalama ritminizi sürdürmesine izin verin. Herhangi bir anda ritmi değiştirmek isterseniz, manuel moda dönmek için düğmeye tekrar dokunun. İkili Elektronik Göğüs Pompası ihtiyaçlarınıza tam olarak yanıt verir. Tam kontrole sahip olduğunuzdan, rahatlayın ve deneyimin keyfini çıkarın. Daha gevşemiş ve rahat olduğunuzda, daha fazla sütü daha hızlı alırsınız. Philips AVENT İkili Elektronik Göğüs Pompasını ilk kez kullanmadan önce lütfen KULLANMA KILAVUZUNU okuyunuz. LÜTFEN BU KILAVUZU SAKLAYIN. Sağlık uzmanınız tarafından aksi tavsiye edilmedikçe, pompa ile süt sağmaya başlamadan önce emzirme düzeninizin oturmasını (genellikle dört haftadır) beklemeniz en iyisidir. 46
48 Göğüs Pompası Parçaları Kontrol pompası ve ikinci pompa (çizim A1 ve A2) a b c d e f g h i j k l m n o 1x Kontrol kolu 2x Silikon diyafram 4x Beyaz valf 2x Pompa gövdesi 4x Süt kabı (2x 125ml ve 2x 260ml) 2x Stand ( h ile aynı) 2x Masaj Yastığı 2x Huni kapak ( f ile aynı) 1x Kontrol kablosu 2x Şeffaf tüp 1x İkili boru 1x Çift pompalama konnektörü 1x Pompa motoru 1x Elektrik adaptörü 1x Fiş kablosu Biberon parçaları (çizim A4) p q r s t 2x Kapak 2x Ekstra Yumuşak Philips AVENT Emzik, Yenidoğan Akışı (0 Ay+) 2x Vidalı halka 2x Sızdırmazlık tabanı 2x Sızdırmazlık diski Manuel parçalar (çizim A5) u v w 1x Pompa kapağı 1x Kol 1x Silikon diyafram ve bağlantı parçası VIA parçaları (çizim A3) x y z VIA Adaptörü VIA Kap VIA Stand/Kapak Kontrol kolu* (çizim B) 1. Kontrol düğmesi 2. Kontrol kolu 3. Kontrol kablo yuvası 4. Boru bağlantı noktası Pompa motoru* (çizim C) 5. Işık 6. İkili boru bağlantı noktası 7. Kontrol kablo yuvası 8. Elektrik soketi 9. Açma/kapama düğmesi *ASLA STERİLİZE ETMEYİN/SUYA SOKMAYIN 47
49 Önemli önlemler PHILIPS AVENT İKİLİ ELEKTRONİK GÖĞÜS POMPASINI KULLANMADAN ÖNCE KULLANMA KILAVUZUNU OKUYUN Elektrikli ürünler kullanırken, özellikle de yanınızda çocuklar varken her zaman, aşağıdakiler dahil temel güvenlik önlemlerini uygulayın. UYARI Yangın, elektrik çarpması veya diğer yaralanmaları önlemek için: Kullanımdan hemen sonra mutlaka fişi prizden çekin. Banyo yaparken kullanmayın. Ürünü düşebileceği ya da küvet veya lavabo içine çekilebileceği yerlere yerleştirmeyin. Pompa motorunu, kontrol kolunu elektrik adaptörünü veya fiş kablosunu suya veya başka sıvılara düşürmeyin. Suya düşmüş bir ürünü almaya kalkışmayın. Derhal fişini çekin. Boğulma tehlikesi oluşturabileceğinden, çocukların veya hayvanların pompa motoru, borular, güç kaynağı veya aksesuarlarla oynamalarına izin vermeyin. Her kullanımdan önce, ana güç kablosu dahil üründe hasar olup olmadığını kontrol edin. Kablo veya fişi hasarlıysa, düzgün çalışmıyorsa, düşürülmüşse veya hasar görmüşse ya da suya batmışsa ürünü kesinlikle kullanmayın. Sadece Philips AVENT tarafından önerilen ek parçaları kullanın. Dış mekanlarda uzatma kablosuyla veya aerosol sprey ürünlerin kullanıldığı veya oksijen verilen yerlerde kullanmayın. Ekipman, hava, oksijen veya azot oksit ile yanıcı anestetik karışımın bulunduğu ortamlarda kullanıma uygun değildir. Yalnızca ürünle birlikte verilen elektrik adaptörünü kullanın. Ünitenin aşırı sıcağa maruz kalmadığından veya doğrudan güneş ışığı altında bırakılmadığından emin olun. Göğüs pompası içinde kullanıcı tarafından değiştirilebilecek parça bulunmamaktadır. Göğüs pompasını açmaya veya onarmaya kalkışmayın. Kabloları sıcak yüzeylerden uzak tutun. Doğrudan süt ile temas eden pompa parçaları kişisel bakım ürünleridir ve başka annelerle paylaşılmamalıdır. Paylaşılabilecek parçalar sadece pompa motoru, kontrol kolu, boru ve çift pompa konnektörüdür. Vakum altındayken pompa gövdesini göğsünüzden ayırmaya çalışmayın. Üniteyi kapatın, göğsünüz ve göğsünüzü tutan pompa hunisi arasına parmağınızı sokarak pompayı göğsünüzden ayırın. Pompalama doğum sancıları çekmenize neden olabileceğinden hamileyken kesinlikle kullanmayın. Uykulu iken kesinlikle kullanmayın. Bu cihaz sorumlu kişiler tarafından kullanım içindir, küçük çocukların ve akli dengesi zayıf kişilerin erişemeyeceği yerde saklayın. Bu cihaz, çocuklar da dahil olmak üzere, kendilerinden sorumlu kişilerin nezareti veya talimatları dışında, fiziksel, motor ya da zihinsel becerileri gelişmemiş veya bilgi ve tecrübe açısından eksik kişiler tarafından kullanılmamalıdır. Küçük çocukların cihazla oynamaları engellenmelidir. DİKKAT Yaralanma, cihaz arızası veya hatası riskini azaltmak için: Ürün, fişi prize takılıyken gözetimsiz bırakılmamalıdır. Herhangi bir deliğe veya boruya yabancı bir cisim sokmayın. Boruları kısaltmayın. Elektrik adaptörü geriliminin güç kaynağı ile uyumlu olduğundan emin olun. Elektrik adaptörünü önce pompa motoruna takın, ardından elektrik kablosunu güvenli bir şekilde elektrik adaptörüne takın. Son olarak, fişi elektrik prizine takın. İlgili EMC yönergelerine uygun olmasına rağmen, bu ekipman aşırı emisyonlara duyarlı olabilir ve/veya daha hassas malzemelerle çatışabilir. Her kullanımdan önce uygun pompa parçalarını yıkayın, durulayın ve sterilize edin. Herhangi bir sonuç alınmazsa beş dakikadan daha uzun süre pompalamayın. Göğüs pompası parçalarını temizlerken antibakteriyel veya aşındırıcı temizlik maddeleri/deterjanlar kullanmayın. Pompanın kalıcı hasar görmesine neden olabileceğinden, kontrol kolunu veya göğüs pompası motorunu kesinlikle suya veya sterilizatöre koymayın. Oluşturulan basınç rahatsız edici ise veya acıya neden oluyorsa, üniteyi kapatın, göğsünüz ve göğsünüzü tutan pompa gövdesi arasına parmağınızı sokarak pompayı göğsünüzden ayırın. 48
 Register your product and get support at www.philips.com/welcome SCF676, SCF675 EN Introduction The Philips AVENT Glass bottle sleeve is designed to specifically fit the Philips AVENT Natural Glass feeding
18-carat white or red gold or platinum Diameter: 43 mm
 TECHNICAL DATA Model Reference Calibre Power reserve J01513xxxx Jaquet Droz 5L60 68 hours Number of jewels 30 Case Watch glasses Display Water-resistant 18-carat white or red gold or platinum Diameter:
Single Electronic Breast Pump. Tire-lait électronique individuel Tekli Elektronik Göğüs Pompası
 GB AR FR TR Single Electronic Breast Pump Tire-lait électronique individuel Tekli Elektronik Göğüs Pompası A A1 A2 a k h l c b g m n d o i e A3 p j f q 1 B 1 4 2 3 C 1 2 D d e c 1 2 g a 5 6 3 f b 3 4 j
Bebek Hamağı Kullanım Kılavuzu Baby Hammock User Guide
 Türk Patent Enstitüsü Tasarım Tescilli 5 Dakikada Kurulum Alman TÜV Rheinland Tarafından Güvenlik Onaylı Bebek Hamağı Kullanım Kılavuzu Baby Hammock User Guide Ürünün kurulum ve kullanımından önce kılavuzu
Single electronic breast pump. Tire-lait électronique individuel Tekli Elektronik Göğüs Pompası
 For our complete catalogue of mother and babycare products A B GB IRL AU NZ AR FR TR call free on 0800 331 6015 GB ONLY (9am 4.30pm Mon-Fri) call free on 1800 744 5477 IRL ONLY (9am 4.30pm Mon-Fri) 1 300
Dijital Biberon Isıtıcı & Sterilizatör. Digital Bottle Warmer & Sterilizer
 Dijital Biberon Isıtıcı & Sterilizatör Digital Bottle Warmer & Sterilizer Değerli Tüketicimiz, Mamajoo ürünlerini tercih ettiğiniz için teşekkür eder, bebeğinizi sağlık ve mutlulukla büyütmenizi dileriz.
Thunderbird Saç Kurutma Makinesi
 Model No: K 054 Thunderbird Saç Kurutma Makinesi / Hair Dryer Kullanma Kılavuzu / Instruction Manual K 054 Thunderbird Saç Kurutma Makinesi MAIN PARTS 1 3 4 2 5 6 7 1. Brush 2. Brush Rotary on/off switch
İthalatçı / Üretici Firma: BSH Ev Aletleri Sanayi ve Ticaret A.Ş., Fatih Sultan Mehmet Mahallesi, Balkan Caddesi No: 51, Ümraniye, İstanbul,
 İthalatçı / Üretici Firma: BSH Ev Aletleri Sanayi ve Ticaret A.Ş., Fatih Sultan Mehmet Mahallesi, Balkan Caddesi No: 51, 34771 Ümraniye, İstanbul, TURKEY T: 216 528 90 00 F: 216 528 99 99 E: info@profilo.com.tr
GENİŞLEYEN GÜVENLİK KAPISI EXPANDING SAFETY GATE
 GENİŞLEYEN GÜVENLİK KAPISI EXPANDING SAFETY GATE www.odabu.com.tr UYARI MONTAJ VE KULLANIM ÖNCESİ KILAVUZ İÇİNDEKİ TÜM TALİMATLARI OKUYUNUZ KILAVUZU İHTİYAÇ DURUMUNDA KULLANMAK ÜZERE SAKLAYINIZ Güvenlik
Manual breast pump. Tire-lait manuel. Manuel Gö üs Pompas. call free on (GB Only) call free on (IRL Only)
 call free on (IRL Only)") GB call free on 0800 331 6015 (GB Only) call free on 1800 744 5477 (IRL Only) 2. call on 1 300 364 474 (AUS) c AR (+971) 800AVENT a FR Renseignements et documentation, Service consommateurs : b d e 0805
GB call free on 0800 331 6015 (GB Only) call free on 1800 744 5477 (IRL Only) 2. call on 1 300 364 474 (AUS) c AR (+971) 800AVENT a FR Renseignements et documentation, Service consommateurs : b d e 0805
KULLANIM KLAVUZU USER MANUAL MANUEL D UTILISATION
 STAR MİNİPRO MERDİVEN TEMİZLEME MAKİNASI STAR MINIPRO STAIR CLEANING MACHINE STAR MINIPRO MINI MONOBROSSE KULLANIM KLAVUZU USER MANUAL MANUEL D UTILISATION STAR MİNİPRO 1 Plastik Kapak 2 Fırça Motoru:
SW CHRONO JD_SW_Chrono_Garantie_2011.indd :43:25
 JD_SW_Chrono_Garantie_2011.indd 1 15.09.2011 16:43:25 TECHNICAL DATA Model Reference J02953xxxx Calibre Jaquet Droz 6885-S Power reserve 40 hours Number of jewels 37 Case Stainless steel Diameter: 45 mm
3 İşlevli LCD Ekran Biberon Isıtıcı & Buhar Sterilizörü. 3-in-1 LCD Screen Bottle Warmer & Steam Sterilizer
 3 İşlevli LCD Ekran Biberon Isıtıcı & Buhar Sterilizörü 3-in-1 LCD Screen Bottle Warmer & Steam Sterilizer Değerli Tüketicimiz, Mamajoo ürünlerini tercih ettiğiniz için teşekkür eder, bebeğinizi sağlık
Manual Breast Pump Tire-lait manuel
 10023-ISIS-GBFRTRAR_1470_cov.qxd 16/10/08 14:31 Page 2 OUTSIDE BACK COVER - 103mm OUTSIDE FRONT COVER - 103mm OUTSIDE ROLL-FOLD 1-102mm OUTSIDE ROLL-FOLD 2-101mm GB FR TR AR Call FREE on 0800 289 064 (GB
LISA AR 5028 XL SAÇ MAŞASI AR 5028 XL CURLING IRON AR 5028 XL LOCKENSTAB KULLANMA KILAVUZU INSTRUCTION MANUAL GEBRAUCHSANWEISUNG 52 W
 LISA AR 5028 XL SAÇ MAŞASI AR 5028 XL CURLING IRON AR 5028 XL LOCKENSTAB KULLANMA KILAVUZU INSTRUCTION MANUAL GEBRAUCHSANWEISUNG 52 W EN LISA AR 5028 XL CURLING IRON 1- Ceramic covered 32 mm curling iron
BPA. Manual Breast Pump. Tire-lait manuel. Manuel Gö üs Pompas
 0% BPA GB AR FR TR Manual Breast Pump Tire-lait manuel Manuel Gö üs Pompas 2. c a b d e f lj g or ou ya da k h l m i n 6. (1) (7) or/ou/ya da/ or/ou/ya da/ or/ /ou/ya da or/ /ou/ya da IMPORTANT: DO NOT
5 İşlevli Dijital Buhar Sterilizörü & Mama Isıtıcı. 5-in-1 Digital Steam Sterilizer & Food Warmer
 5 İşlevli Dijital Buhar Sterilizörü & Mama Isıtıcı 5-in-1 Digital Steam Sterilizer & Food Warmer Değerli Tüketicimiz, Mamajoo ürünlerini tercih ettiğiniz için teşekkür eder, bebeğinizi sağlık ve mutlulukla
bab.la Cümle Kalıpları: Kişisel Dilekler Fransızca-Hintçe
 Dilekler : Evlilik Félicitations. Nous vous souhaitons à tous les deux tout le bonheur du monde. त म ह र श द क अवसर पर बध ई ह. म र आश र व द ह क त म सद स ख रह. Yeni evli bir çifti Félicitations et meilleurs
a, ı ı o, u u e, i i ö, ü ü
 Possessive Endings In English, the possession of an object is described by adding an s at the end of the possessor word separated by an apostrophe. If we are talking about a pen belonging to Hakan we would
Çekim Ayarlı Manuel Göğüs Pompası. Suction Adjustable Manuel Breast Pump. Manuelle Milchpumpe mit Saugeinstellung
 Çekim Ayarlı Manuel Göğüs Pompası Suction Adjustable Manuel Breast Pump Manuelle Milchpumpe mit Saugeinstellung Tire-lait Manuel à Aspiration Réglable TR - KULLANIM KILAVUZU Değerli Tüketicimiz, Mamajoo
AKE Bulaşık Yıkama Makinası Kontrol Kartı Kullanım Kılavuzu Dishwasher Controller User Manual TR EN
 Bulaşık Yıkama Makinası Kontrol Kartı Kullanım Kılavuzu Dishwasher Controller User Manual Bulaşık Yıkama Makinası Kontrol Kartı Kullanım Kılavuzu (7 SEG SIMPLE YATAY TİP) AKE-BYM-102 Lütfen bu kullanım
NONA AR IN 1 DİKEY ELEKTRİKLİ SÜPÜRGE AR IN 1 UPRIGHT VACUUM CLEANER KULLANMA KILAVUZU INSTRUCTION MANUAL 1200 W Ü Ç G E N B A Ş L I K
 NONA AR 4016 2 IN 1 DİKEY ELEKTRİKLİ SÜPÜRGE AR 4016 2 IN 1 UPRIGHT VACUUM CLEANER KULLANMA KILAVUZU INSTRUCTION MANUAL 1200 W Ü Ç G E N B A Ş L I K EN NONA AR 4016 2 in 1 UPRIGHT VACUUM CLEANER 1- Main
MESOS (Merkezi Sistem Ortak Sınav) PRACTICE TEST 1
 PRACTICE TEST 1") MESOS (Merkezi Sistem Ortak Sınav) PRACTICE TEST 1 1. Konuşma balonundaki cümleyi doğru tamamlayan sözcüğü seçiniz 3. Verilen cümlede boşluğa gelecek sözcüğü seçeneklerden işaretleyiniz. We have got flowers
MESOS (Merkezi Sistem Ortak Sınav) PRACTICE TEST 1 1. Konuşma balonundaki cümleyi doğru tamamlayan sözcüğü seçiniz 3. Verilen cümlede boşluğa gelecek sözcüğü seçeneklerden işaretleyiniz. We have got flowers
HIGH SPEED PVC DOOR INSTALLATION BOOK
 HIGH SPEED PVC DOOR INSTALLATION BOOK HIZLI PVC KAPI MONTAJ KLAVUZU MODEL FUD 2015.01 MONTAJ KLAVUZU/INSTALLATION BOOK INTRODUCTION The information contained in this manual will allow you to install your
PopCorn K 313. Kullanma Kılavuzu / Instruction Manual. Mısır Patlatma Makinesi Popcorn Maker. Mısır Patlatma Makinesi.
 Model No: K 313 PopCorn Mısır Patlatma Makinesi Popcorn Maker Kullanma Kılavuzu / Instruction Manual K 313 PopCorn Mısır Patlatma Makinesi Popcorn Maker Meaning of the Symbols in These Instructions All
ingilizce.com-müşterilerle En çok kullanılan Kelime ve Deyimler-Top words and phrases to use with customers
 The Top words and phrases to use with customers Müşterilerle En Çok Kullanılan Kelime ve Deyimler Definitely Kesinlikle Surely Tabii! Kesinlikle Absolutely Muhakkak Kesinlikle Certainly Elbette PHRASES
AQUARIUM ACCESSORIES
 AQUARIUM ACCESSORIES İçindekiler - Contents 01 AKILLI İÇ FİLTRE / SMART INTERNAL FILTER 11 İÇ FİLTRE 1400 T / INTERNAL FILTER 1400 T 03 İÇ FİLTRE 600 F / INTERNAL FILTER 600 F 12 İÇ FİLTRE 1800 T / INTERNAL
D-Link DSL 500G için ayarları
 Celotex 4016 YAZILIM 80-8080-8081 İLDVR HARDWARE YAZILIM 80-4500-4600 DVR2000 25 FPS YAZILIM 5050-5555-1999-80 EX-3004 YAZILIM 5555 DVR 8008--9808 YAZILIM 80-9000-9001-9002 TE-203 VE TE-20316 SVDVR YAZILIM
Teknoloji Servisleri; (Technology Services)
") Antalya International University Teknoloji Servisleri; (Technology Services) Microsoft Ofis Yazılımları (Microsoft Office Software), How to Update Office 365 User Details How to forward email in Office
Antalya International University Teknoloji Servisleri; (Technology Services) Microsoft Ofis Yazılımları (Microsoft Office Software), How to Update Office 365 User Details How to forward email in Office
800 W CEZVELİ KULLANMA KILAVUZU INSTRUCTION MANUAL GEBRAUCHSANWEISUNG
 CEZVELİ AR 3018 TÜRK KAHVESİ MAKİNESİ AR 3018 TURKISH COFFEE MAKER AR 3018 TÜRKISCHE KAFFEEMASCHIENE KULLANMA KILAVUZU INSTRUCTION MANUAL GEBRAUCHSANWEISUNG 800 W EN CEZVELİ AR 3018 TURKISH COFFEE MAKER
Zest. : Shower Unit (Flat) Kompakt Duş Ünitesi (Flat) Description Tan m. : 90x90. Size / Ebat (cm) : 2.5. Depth / Derinlik (cm) Weight / A rl k (kg)
 Kompakt Duş Ünitesi (Flat) Description Tan m. : 90x90. Size / Ebat (cm) : 2.5. Depth / Derinlik (cm) Weight / A rl k (kg)") Zest Description Tan m : Shower Unit (Flat) Kompakt Duş Ünitesi (Flat) Left/Sol Right/Sağ Size / Ebat (cm) : 90x90 Depth / Derinlik (cm) : 2.5 Weight / A rl k (kg) : min. 75 max. 90 Height / Yükseklik
Zest Description Tan m : Shower Unit (Flat) Kompakt Duş Ünitesi (Flat) Left/Sol Right/Sağ Size / Ebat (cm) : 90x90 Depth / Derinlik (cm) : 2.5 Weight / A rl k (kg) : min. 75 max. 90 Height / Yükseklik
Virtualmin'e Yeni Web Sitesi Host Etmek - Domain Eklemek
 Yeni bir web sitesi tanımlamak, FTP ve Email ayarlarını ayarlamak için yapılması gerekenler Öncelikle Sol Menüden Create Virtual Server(Burdaki Virtual server ifadesi sizi yanıltmasın Reseller gibi düşünün
INSTALLATION INSTRUCTIONS. York Prelude Part #: Read carefully. Wear protective gloves
 INSTALLATION INSTRUCTIONS York Prelude Part #: 1720 Confidence from start to finish. Read carefully Wear protective gloves JACLO.COM PG 1 PARTS 1. Wall support 2. Screws and expansion bolts 3. Cover 4.
CNC MACH breakout board user manual V8 type
 CNC MACH breakout board user manual V8 type 1 Catalogue CNC Router breakout board V8 type user manual... Hata! Yer işareti tanımlanmamış. 1) Brief introduction:...3 2) Breakout board drawing:...4 3) Wiring:...5
2000 W FLORA KULLANMA KILAVUZU INSTRUCTION MANUAL GEBRAUCHSANWEISUNG
 FLORA AR 3012 GİZLİ REZİSTANSLI SU ISITICI AR3012 KETTLE WITH CONCEALED RESISTANCE AR 3012 WASSERKOCHER MIT UNSICHTBAREM HEIZELEMENT KULLANMA KILAVUZU INSTRUCTION MANUAL GEBRAUCHSANWEISUNG 2000 W FLORA
IDENTITY MANAGEMENT FOR EXTERNAL USERS
 1/11 Sürüm Numarası Değişiklik Tarihi Değişikliği Yapan Erman Ulusoy Açıklama İlk Sürüm IDENTITY MANAGEMENT FOR EXTERNAL USERS You can connect EXTERNAL Identity Management System (IDM) with https://selfservice.tai.com.tr/
AB surecinde Turkiyede Ozel Guvenlik Hizmetleri Yapisi ve Uyum Sorunlari (Turkish Edition)
") AB surecinde Turkiyede Ozel Guvenlik Hizmetleri Yapisi ve Uyum Sorunlari (Turkish Edition) Hakan Cora Click here if your download doesn"t start automatically AB surecinde Turkiyede Ozel Guvenlik Hizmetleri
AB surecinde Turkiyede Ozel Guvenlik Hizmetleri Yapisi ve Uyum Sorunlari (Turkish Edition) Hakan Cora Click here if your download doesn"t start automatically AB surecinde Turkiyede Ozel Guvenlik Hizmetleri
550 W MİO GLASS 0.5 KULLANMA KILAVUZU INSTRUCTION MANUAL GEBRAUCHSANWEISUNG
 MÇİFT KATLI PASLAN MİO GLASS AR 1043 CAM HAZNELİ DOĞRAYICI AR 1043 CHOPPER WITH GLASS BOWL AR 1043 ZERSCHNEIDER MIT GLASBEHÄLTER KULLANMA KILAVUZU INSTRUCTION MANUAL GEBRAUCHSANWEISUNG 550 W Ç E L İ K
WPB 820 ELEKTRIC BREAST PUMP TIRE-LAIT ELECTRIQUE ELEKTRIKLI GÖGÜS POMPASI USER MANUAL MODE D EMPLOI ELEKTRONIK GÖGÜS POMPALARI KULLANIM KILAVUZU
 WPB 820 ELEKTRIC BREAST PUMP TIRE-LAIT ELECTRIQUE ELEKTRIKLI GÖGÜS POMPASI ELEKTRONIK GÖGÜS POMPALARI USER MANUAL MODE D EMPLOI KULLANIM KILAVUZU EN FR TR WPB 820 USER MANUAL I 1 CONTENTS Instruction manual...2
700 W WAFFY KULLANMA KILAVUZU INSTRUCTION MANUAL GEBRAUCHSANWEISUNG PASLANMAZ ÇELİK W A F F L E P L A K A L A R
 WAFFY AR 296 WAFFLE MAKİNESİ AR 296 WAFFLE MAKER AR 296 WAFFEL MASCHINE KULLANMA KILAVUZU INSTRUCTION MANUAL GEBRAUCHSANWEISUNG 700 W YAPIŞMAZ PASLANMAZ ÇELİK W A F F L E P L A K A L A R EN WAFFY AR 296
WEM500 BOTTLE WARMER CHAUFFE - BIBERON BİBERON ISITICISI USER MANUAL MODE D EMPLOI KULLANIM KILAVUZU
 WEM500 BOTTLE WARMER CHAUFFE - BIBERON BİBERON ISITICISI USER MANUAL MODE D EMPLOI KULLANIM KILAVUZU EN FR TR Contents User Manual... 3 Composition... 3 Important information... 3 Getting started... 4
MOTHER & BABY SCALE BALANCE ELECTRONIQUE ANNE & BEBEK TARTISI WWD720 WWD722 USER MANUAL MODE D EMPLOI KULLANIM KILAVUZU
 WWD720 WWD722 MOTHER & BABY SCALE BALANCE ELECTRONIQUE ANNE & BEBEK TARTISI USER MANUAL MODE D EMPLOI KULLANIM KILAVUZU EN FR TR Mother & Baby Scale User Manual I 1 CONTENTS SPECIFICATIONS...3 POWERUPPLY...3
www.cagsanmerdiven.com - bilgi@cagsanmerdiven.com.tr
 Kurulum Kılavuzu Introduction Manuel YAY MONTAJ VİDALARI ZİNCİR KİLİT BRAKETİ SPRING ASSEMBLY SCREWS CHAIN LINK CATCH BRACKET AHŞAP ÇATI MERDİVENİ WOODEN LOFT LADDER www.cagsanmerdiven.com - bilgi@cagsanmerdiven.com.tr
1650 W ÇAYCI HEPTAZE KULLANMA KILAVUZU INSTRUCTION MANUAL GEBRAUCHSANWEISUNG PASLANMAZ ÇELİK K A P A K
 ÇAYCI HEPTAZE AR 3023 / AR 3024 / AR 3031 / AR 3032 / AR 3027 / AR 3040 ÇAY MAKİNESİ AR 3023 / AR 3024 / AR 3031 / AR 3032 / AR 3027 / AR 3040 TEA MACHINE AR 3023 / AR 3024 / AR 3031 / AR 3032 / AR 3027
KT 33. Kullanım Kılavuzu Su Isıtıcısı. Instructions Manual Kettle
 KT 33 TR GB Kullanım Kılavuzu Su Isıtıcısı Instructions Manual Kettle İÇİNDEKİLER TR Genel... Kullanma talimatları hakkında bilgi... Sorumluluk... Kullanma talimatları hakkında uyarılar... Güvenlik...
bab.la Phrases: Personnel Meilleurs Vœux français-turc
 Meilleurs Vœux : Mariage Félicitations. Nous vous souhaitons à tous les deux tout le bonheur du monde. Tebrikler. Dünyadaki tüm mutluluklar üzerinizde olsun. Félicitations et meilleurs vœux à vous deux
1150 W TRIPPER KULLANMA KILAVUZU INSTRUCTION MANUAL GEBRAUCHSANWEISUNG T U T M A S A P I
 TRIPPER AR 690 SEYAHAT ÜTÜSÜ AR 690 TRAVEL IRON AR 690 REİSE BÜGELEİSEN KULLANMA KILAVUZU INSTRUCTION MANUAL GEBRAUCHSANWEISUNG 1150 W KATLANABİLİR T U T M A S A P I SEYAHATLER İÇİN EN 1- Ceramıc coated
1650 W ÇAYCI KLASİK KULLANMA KILAVUZU INSTRUCTION MANUAL GEBRAUCHSANWEISUNG PASLANMAZ ÇELİK K A P A K
 ÇAYCI KLASİK AR 3006 ÇAY MAKİNESİ AR 3006 TEA MAKER AR 3006 ELEKTRISCHE TEEKANNE KULLANMA KILAVUZU INSTRUCTION MANUAL GEBRAUCHSANWEISUNG 1650 W PASLANMAZ ÇELİK PASLANMAZ ÇELİK İ Ç A Y F İ LT R E S ÇİFT
PRİZ KOLYE Clamp Saddles
 PRİZ PR!Z KOLYE KOLYE C!VATALI!"#&'( (,' -%$.'/)!"#&'( (! *'01% "$'!.%3+1, /&%!.") #&4!.%)%,,((!"#&'( (,' -%$.'/) #&4!.%)%,,(( (!Ambalaj *'01% "$'!.%3+1, Adedi D x G /&%!.")!"#&'( 9111 x ½ 918 1 x ¾ 911
BELISA AR 5033 SAÇ MAŞASI AR5033 CURLER AR5033 LOCKENSTAB KULLANMA KILAVUZU INSTRUCTION MANUAL GEBRAUCHSANWEISUNG 50 W SERA M İK P LA K ALA R
 BELISA AR 5033 SAÇ MAŞASI AR5033 CURLER AR5033 LOCKENSTAB KULLANMA KILAVUZU INSTRUCTION MANUAL GEBRAUCHSANWEISUNG 50 W KERATIN VE ARGAN YAĞI KATKILI SERA M İK P LA K ALA R EN BELISA AR 5033 CURLING IRON
Seri kablo bağlantısında Windows95/98/ME'ten Windows 2000'e bağlantı Windows95/98/ME - NT4 bağlantısına çok benzer.
 Seri kablo bağlantısında Windows95/98/ME'ten Windows 2000'e bağlantı Windows95/98/ME NT4 bağlantısına çok benzer. Direkt Kablo desteğini Windows95/98'e yükledikten sonra, Windows95 for Direct Cable Client
Register your product and get support at.
 Register your product and get support at www.philips.com/welcome ENGLISH Introduction Congratulations on your purchase and welcome to Philips! To fully benefit from the support that Philips offers, register
KULLANMA KLAVUZU / USER'S GUIDE GTİP/HS Code:
 MOTORLU ÇOKLU ASTAR KESME MAKİNESİ MOTOR DRIVEN LINING CUTTING MACHINE KULLANMA KLAVUZU / USER'S GUIDE GTİP/HS Code: 8461.90.00.00.00 Çelik Kuyumculuk Kalıp Makine San. Ve Tic. Ltd. Şti. Adres: Atatürk
Downloaded from www.vandenborre.be
 FR Notice d'utilisation 2 TR Kullanma Kılavuzu 11 Réfrigérateur/congélateur Buzdolabı ZRT23100WA Sommaire Instructions de sécurité 2 Avant la première utilisation 4 Utilisation quotidienne 5 Conseils 5
Meira Mini Robot. Meira Mini Chopper Instruction Manual Meira Mini Robot Kullanma Kılavuzu
 Meira Mini Robot Meira Mini Chopper Instruction Manual Meira Mini Robot Kullanma Kılavuzu Girifl Uzun y llar sorunsuz çal flmas için tasarlanan ve üretilen Fakir Meira mini robotu sat n alm fl oldu unuz
K 5018 Hanımeli Elektrikli Pişirici Pizza Pan
 Model No: K 5018 Hanımeli Elektrikli Pişirici Pizza Pan Kullanma Kılavuzu / Instruction Manual K 5018 Hanımeli Elektrikli Pişirici Pizza Pan MAIN PARTS 1 3 4 2 6 5 7 9 8 1. Glass lid 2. Handles 3. Cooking
CLARO AR 688 SERAMİK TABANLI ÜTÜ AR 688 CERAMIC SOLEPLATE IRON KULLANMA KILAVUZU INSTRUCTION MANUAL 2400 W
 CLARO AR 688 SERAMİK TABANLI ÜTÜ AR 688 CERAMIC SOLEPLATE IRON KULLANMA KILAVUZU INSTRUCTION MANUAL 2400 W EN CLARO AR 688 CERAMIC SOLEPLATE IRON We thank you for having selected the Arzum brand iron.
Ardunio ve Bluetooth ile RC araba kontrolü
 Ardunio ve Bluetooth ile RC araba kontrolü Gerekli Malzemeler: 1) Arduino (herhangi bir model); bizim kullandığımız : Arduino/Geniuno uno 2) Bluetooth modül (herhangi biri); bizim kullandığımız: Hc-05
: Shower Unit (Flat) : Kompakt Duș Ünitesi (Flat)
 : Kompakt Duș Ünitesi (Flat)") Veo Description Tanım : Shower Unit (Flat) : Kompakt Duș Ünitesi (Flat) Left/Sol Right/Sağ Size / Ebat (cm) : 190x90 Depth / Derinlik (cm) : 3,5 Height / Yükseklik (cm) : 215 Weight / Ağırlık (kg) : min.
Veo Description Tanım : Shower Unit (Flat) : Kompakt Duș Ünitesi (Flat) Left/Sol Right/Sağ Size / Ebat (cm) : 190x90 Depth / Derinlik (cm) : 3,5 Height / Yükseklik (cm) : 215 Weight / Ağırlık (kg) : min.
econn (Supplier Portal) of the MANN+HUMMEL Group
 of the MANN+HUMMEL Group") econn (Supplier Portal) of the MANN+HUMMEL Group October 2016 1 econn CONNECTED FOR SUCCESS Support If you have any questions or technical issues during the registration please contact: Teknik sorularınız
econn (Supplier Portal) of the MANN+HUMMEL Group October 2016 1 econn CONNECTED FOR SUCCESS Support If you have any questions or technical issues during the registration please contact: Teknik sorularınız
WEM500 BOTTLE WARMER CHAUFFE - BIBERON BİBERON ISITICISI BİBERON ISITICILARI USER MANUAL MODE D EMPLOI KULLANIM KILAVUZU
 WEM500 BOTTLE WARMER CHAUFFE - BIBERON BİBERON ISITICISI BİBERON ISITICILARI USER MANUAL MODE D EMPLOI KULLANIM KILAVUZU EN FR TR Contents User Manual... 3 Composition... 3 Important information... 3 Getting
25 W BELISA KULLANMA KILAVUZU INSTRUCTION MANUAL GEBRAUCHSANWEISUNG S E R A Mİ K P L A K A L A R
 S E R A Mİ K P L A K A L A R BELISA AR 5025 SAÇ ŞEKİLLENDİRİCİ AR 5025 HAIR STYLER AR 5025 HAAR-STYLING KULLANMA KILAVUZU INSTRUCTION MANUAL GEBRAUCHSANWEISUNG 25 W KERATİN KATKILI 1- Main body BELISA
Allaturca Türk Kahve Makinesi Turkish Coffee Maker
 Model No: K 441 Allaturca Türk Kahve Makinesi Turkish Coffee Maker Kullanma Kılavuzu / Instruction Manual K 441 Allaturca Türk Kahve Makinesi Turkish Coffee Maker PARÇALAR 1 2 6 5 4 3 1 Tutacak 2 300 ml
KIMSE KIZMASIN KENDIMI YAZDIM BY HASAN CEMAL
 KIMSE KIZMASIN KENDIMI YAZDIM BY HASAN CEMAL DOWNLOAD EBOOK : KIMSE KIZMASIN KENDIMI YAZDIM BY HASAN CEMAL Click link bellow and free register to download ebook: KIMSE KIZMASIN KENDIMI YAZDIM BY HASAN
H48.33b FILTER DRIER SHELLS KARTUŞ KOVANLARI. H48.33b.54.1
 H48.33b H48.33b.54.1 Introduction Filter drier shells are important equipments for refrigeration and air conditioning systems. They are designed to be used in the suction line and liquid line. Filter drier
Arýza Giderme. Troubleshooting
 Arýza Giderme Sorun Olasý Nedenler Giriþ Gerilimi düþük hata mesajý Þebeke giriþ gerilimi alt seviyenin altýnda geliyor Þebeke giriþ gerilimi tehlikeli derecede Yüksek geliyor Regülatör kontrol kartý hatasý
700 W WAFİTO W A F F L E P L A K A L A R KULLANMA KILAVUZU INSTRUCTION MANUAL GEBRAUCHSANWEISUNG
 W A F F L E P L A K A L A R I WAFİTO AR 295 TOST VE WAFFLE MAKİNESİ AR 295 SANDWICH AND WAFFLE AR 295 WAFFEL- und TOASTMASCHINE KULLANMA KILAVUZU INSTRUCTION MANUAL GEBRAUCHSANWEISUNG 700 W 2 ADET TOST
1500 W PROSTICK 1500 WATT KULLANMA KILAVUZU INSTRUCTION MANUAL GEBRAUCHSANWEISUNG ML Ö L Ç Ü I K A B
 PROSTICK 1500 AR 1045 EL BLENDER AR 1045 HAND BLENDER AR 1045 HAND BLENDER KULLANMA KILAVUZU INSTRUCTION MANUAL GEBRAUCHSANWEISUNG 1500 W 1500 WATT 900 ML Ö L Ç Ü I K A B PROSTICK 1500 AR 1045 HAND BLENDER
Guide de l utilisateur
 Guide de l utilisateur CAMÉSCOPE GC-PX100 D GC-P100 D LYT2595-002A-M FR Manuel d utilisation Mode D'emploi Mobile Pour de plus amples détails sur le fonctionnement de ce produit, veuillez consulter le
DOPPIO. Fanlı Isıtıcı Fan Heater. Kullanım Kılavuzu Instruction Manual
 DOPPIO Fanlı Isıtıcı Fan Heater Kullanım Kılavuzu Instruction Manual Giriş Size uzun yıllar güvenle hizmet verecek olan Fakir Doppio Fanlı Isıtıcı yı satın almış olduğunuz için sizi kutlarız.benzer ürünleri
MİXXİ COLOR AR 1047 MİKSER AR 1047 MIXER AR 1047 MIXER KULLANMA KILAVUZU INSTRUCTION MANUAL GEBRAUCHSANWEISUNG 700 W T U R B O F O N K Sİ Y O N
 MİXXİ COLOR AR 1047 MİKSER AR 1047 MIXER AR 1047 MIXER KULLANMA KILAVUZU INSTRUCTION MANUAL GEBRAUCHSANWEISUNG 700 W T U R B O F O N K Sİ Y O N MİXXİ COLOR AR 1047 MIXER We thank you for having selected
Cezvem Türk Kahve Makinesi
 Model No: P 44 Cezvem Türk Kahve Makinesi Türkish Coffee Maker Kullanma Kılavuzu / Instruction Manual P 44 Cezvem Türk Kahve Makinesi Türkish Coffee Maker MAIN PARTS 1 Handle 2 Stainless steel bowl with
Delta Pulse 3 Montaj ve Çalıstırma Kılavuzu. www.teknolojiekibi.com
 Delta Pulse 3 Montaj ve Çalıstırma Kılavuzu http:/// Bu kılavuz, montajı eksiksiz olarak yapılmış devrenin kontrolü ve çalıştırılması içindir. İçeriğinde montajı tamamlanmış devrede çalıştırma öncesinde
1650 W 800 W EHLİKEYİF DELUX KULLANMA KILAVUZU INSTRUCTION MANUAL GEBRAUCHSANWEISUNG U L L PASLANMAZ ÇELİK K A P A K K A T L A N A B İ Lİ R S A P
 EHLİKEYİF DELUX AR 3008 ÇAY VE KAHVE MAKİNESİ SETİ AR3008 TEA MAKER AND TURKISH COFFEE MAKER SET AR 3008 TEEKANNE UND TURKISCH KAFFEE SET KULLANMA KILAVUZU INSTRUCTION MANUAL GEBRAUCHSANWEISUNG 1650 W
THALES. Kullanım Kılavuzu Çay Makinesi. Instructions Manual Tea Maker
 THALES TR GB Kullanım Kılavuzu Çay Makinesi Instructions Manual Tea Maker İÇİNDEKİLER TR Genel...4 Kullanma talimatları hakkında bilgi...4 Sorumluluk...4 Kullanma talimatları hakkında uyarılar...4 Güvenlik...5
KT 83. Kullanım Kılavuzu Su Isıtıcı. Instruction Manual Kettle
 KT 83 TR GB Kullanım Kılavuzu Su Isıtıcı Instruction Manual Kettle TR İÇİNDEKİLER Genel... Kullanma talimatları hakkında bilgi... Sorumluluk... Kullanma talimatları hakkında uyarılar... Güvenlik... CE
Choreography Notes for: Usta-Çırak 2014 Schadia, all rights reserved
 5 4 Usta-Çırak Usta sen ol bu sefer çırağın ben. Yaklaşa yaklaşa mesafe kalmadı. Dünden hazırız ama cesaret olmalı Sen bana aşık ben sana aşık Ne duruyoruz ki başlasak artık? Seni çözmek için alt yazı
GOLDIE. Kullanım Kılavuzu Su Isıtıcı. Instruction Manual Kettle
 GOLDIE TR EN Kullanım Kılavuzu Su Isıtıcı Instruction Manual Kettle TR GOLDIE Genel... Kullanma talimatları hakkında bilgi... Sorumluluk... Kullanma talimatları hakkında uyarılar... Güvenlik... CE Uygunluk
Lenovo A369i. Quick Start Guide v1.0. English/Türkçe
 Lenovo A369i Quick Start Guide v1.0 English/Türkçe English Read this guide carefully before using your smartphone. Electronic emission notices European Union conformity Radio and Telecommunications Terminal
MIXWELL. Kullanım Kılavuzu El Blenderi. Instruction Manual Hand Blender
 MIXWELL TR GB Kullanım Kılavuzu El Blenderi Instruction Manual Hand Blender TR İÇİNDEKİLER Genel...3 Kullanma Talimatları Hakkında Bilgi...3 Sorumluluk...3 Kullanma Talimatları Hakkında Uyarılar...3 Güvenlik...4
VITRUM. Mutfak Terazisi Electronic Kitchen Scale. Instruction Manual Kullan m K lavuzu
 VITRUM Mutfak Terazisi Electronic Kitchen Scale Instruction Manual Kullan m K lavuzu 2 G R fi Uzun y llar sorunsuz çal flmas için tasarlanan ve üretilen Fakir Vitrum Elektronik Mutfak Tart s n sat n alm
Children being supervised not to play with the appliance.
 SHB 3068 BLENDER EN Children being supervised not to play with the appliance. This appliance is not intended for use by persons (including children) with reduced physical, sensory or mental capabilities,
GALAXY. Kullanım Kılavuzu Su Isıtıcı. Instruction Manual Kettle
 GALAXY TR GB Kullanım Kılavuzu Su Isıtıcı Instruction Manual Kettle TR İÇİNDEKİLER Genel... Kullanma talimatları hakkında bilgi... Sorumluluk... Kullanma talimatları hakkında uyarılar... Güvenlik... CE
Indoor wireless headphones
 Register your product and get support at www.philips.com/welcome Indoor wireless headphones SHC8535 SHC8575 TR Kullanım kılavuzu SHC8535 SHC8535 A a b B a c d b e f c C D E F a G b H I 1 Kutuda neler var
CAUTION TO REDUCE THE RISK OF ELECTRIC SHOCK, DO NOT REMOVE COVER OR BACK. THERE ARE NO USER-SERVICEABLE PARTS INSIDE.
 Symbol for Separate Collection in European Countries This symbol indicates that this product is to be collected separately. The following apply only to users in European countries: This product is designated
Değerli Daxom Kullanıcısı,
 Değerli Daxom Kullanıcısı, Cihazın fonksiyonunu doğru olarak yerine getirmesi ve güvenliğiniz için cihazın montaj ve kullanımı esnasında kullanma kılavuzunda belirtilen talimatlara uyunuz. Yetkisiz olarak
Sierra. Hand mixer El mixeri. Instruction Manual Kullan m K lavuzu
 Sierra Hand mixer El mixeri Instruction Manual Kullan m K lavuzu Girifl Uzun y llar sorunsuz çal flmas için tasarlanan ve üretilen Fakir Sierra El Mikser ini sat n alm fl oldu unuz için teflekkür ederiz.
SVC 3464 ELEKTR KL SÜPÜRGE
 SVC 3464 ELEKTR KL SÜPÜRGE FR Children being supervised not to play with the appliance. This appliance is not intended for use by persons (including children) with reduced physical, sensory or mental capabilities,
AE-AH SERİSİ MONTAJ KILAVUZU/ AE-AH SERIES INSTALLATION MANUAL
 AE-AH SERİSİ MONTAJ KILAVUZU/ AE-AH SERIES INSTALLATION MANUAL 5 8 9 10 1 2 3 4 6 7 11 1-Tepe adaptörü-top adaptor 6- Ara boru bağlantı vidası- Profile connection screws 2-Ara adaptör- Adaptor 7- Yelken
Exercise 2 Dialogue(Diyalog)
") Going Home 02: At a Duty-free Shop Hi! How are you today? Today s lesson is about At a Duty-free Shop. Let s make learning English fun! Eve Dönüş 02: Duty-free Satış Mağazasında Exercise 1 Vocabulary and
Going Home 02: At a Duty-free Shop Hi! How are you today? Today s lesson is about At a Duty-free Shop. Let s make learning English fun! Eve Dönüş 02: Duty-free Satış Mağazasında Exercise 1 Vocabulary and
Galatasaray University
 Inflation Galatasaray University 11 Novembre,2013 Inflation ( ch. 6 R. Hahnel 1/ 23 definition Le prix est le montant monétaire échangé contre un bien ou un service lors d un achat ou d une vente Les prix
WWD700 DIGITAL BABY SCALE PESE-BEBE NUMERIQUE DİJİTAL BEBEK TARTISI USER MANUAL MODE D EMPLOI KULLANIM KILAVUZU
 WWD700 DIGITAL BABY SCALE PESE-BEBE NUMERIQUE DİJİTAL BEBEK TARTISI USER MANUAL MODE D EMPLOI KULLANIM KILAVUZU EN FR TR Contents Technical Properties... 3 Button Functions... 4 ON/OFF/TARE Button:...4
2200 W HAIRSTIL PRO KULLANMA KILAVUZU INSTRUCTION MANUAL GEBRAUCHSANWEISUNG
 HAIRSTIL PRO AR 5009 PROFESYONEL SAÇ KURUTMA MAKİNESİ AR 5009 PROFESSIONAL HAIR DRYER AR 5009 PROFESSIONAL HAARTROCKNER KULLANMA KILAVUZU INSTRUCTION MANUAL GEBRAUCHSANWEISUNG 2200 W HAIRSTIL PRO AR 5009
SVC 3464 ELEKTR KL SÜPÜRGE
 SVC 3464 ELEKTR KL SÜPÜRGE EN Children being supervised not to play with the appliance. This appliance is not intended for use by persons (including children) with reduced physical, sensory or mental capabilities,
ADELL. Kullanım Kılavuzu Su Isıtıcı. Instruction Manual Kettle
 TR EN Kullanım Kılavuzu Su Isıtıcı Instruction Manual Kettle TR Genel... Kullanma talimatları hakkında bilgi... Sorumluluk... Kullanma talimatları hakkında uyarılar... CE Uygunluk deklarasyonu... Kullanım
PROSTICK 1000 AR 1016 ÇUBUK BLENDER SETİ AR 1016 HAND BLENDER SET AR 1016 STABMIXER-SET KULLANMA KILAVUZU INSTRUCTION MANUAL GEBRAUCHSANWEISUNG 1000 W
 PROSTICK 1000 AR 1016 ÇUBUK BLENDER SETİ AR 1016 HAND BLENDER SET AR 1016 STABMIXER-SET KULLANMA KILAVUZU INSTRUCTION MANUAL GEBRAUCHSANWEISUNG 1000 W EN PROSTICK 1000 AR 1016 HAND BLENDER SET 1- Motor
RCT 108 Turbo. fiarjl El Süpürgesi - Kullanma K lavuzu. Rechargeable Cleaner - Instruction Manual
 RCT 108 Turbo fiarjl El Süpürgesi - Kullanma K lavuzu Rechargeable Cleaner - Instruction Manual Giriş Uzun yıllar sorunsuz çalışması için tasarlanan ve üretilen bu ürünü satın aldığınız için teşekkür
TEMPER. Kullanım Kılavuzu Çay Makinesi. Instructions Manual Tea Maker
 TEMPER TR EN Kullanım Kılavuzu Çay Makinesi Instructions Manual Tea Maker İÇİNDEKİLER TR Genel...4 Kullanma talimatları hakkında bilgi...4 Sorumluluk...4 Kullanma talimatları hakkında uyarılar...4 Güvenlik...5
Çelik Kuyumculuk Kalıp Makine San. Ve Tic. Ltd. Şti.
 Çelik Kuyumculuk Kalıp Makine San. Ve Tic. Ltd. Şti. Fabrika Adres: Atatürk Mahallesi Marmara Sanayi Sitesi L Blok No: 3 İkitelli / İstanbul Türkiye Telefon: +90 212 494 44 60 Fax: +90 212 494 44 61 E-mail
Çalışma gelirinizi beyan etmeyi kolaylaştırıyoruz
 TURKISH Çalışma gelirinizi beyan etmeyi kolaylaştırıyoruz Çalışma gelirinizi beyan etmenizi ve durumunuzdaki değişiklikleri bildirmenizi kolaylaştıracak iyileştirmeler yapıyoruz. Kendi kendine beyan yöntemi